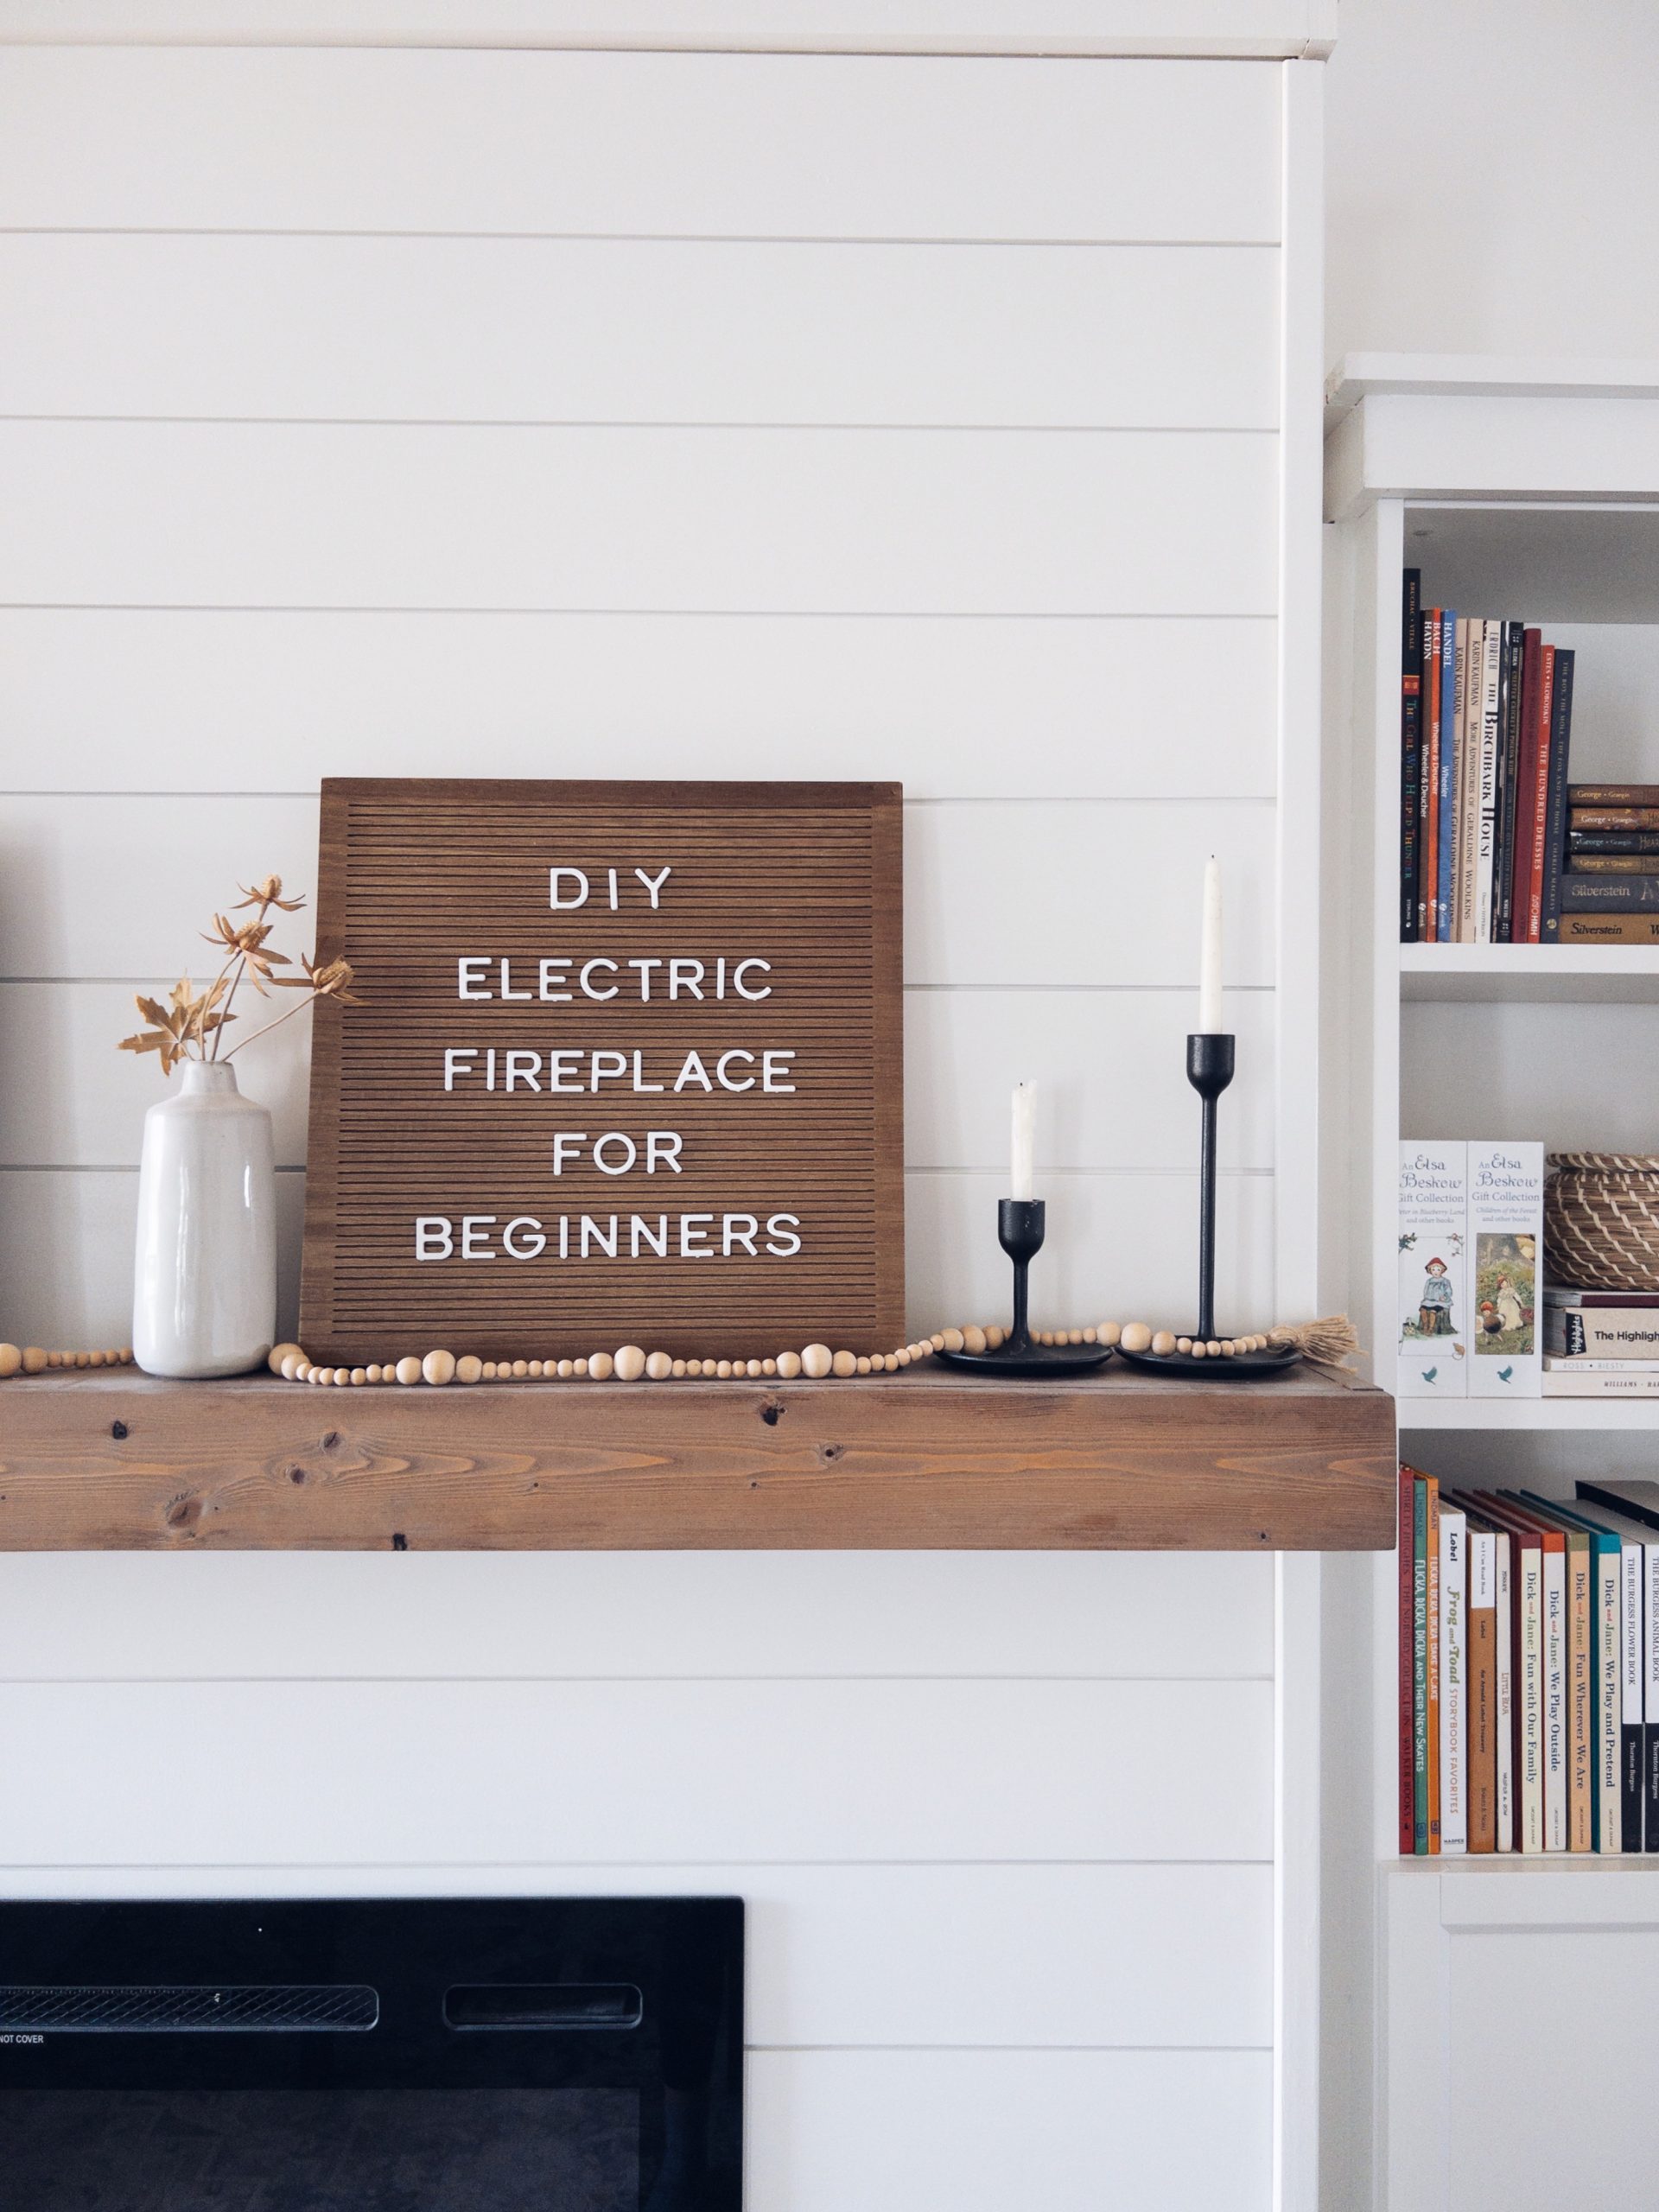
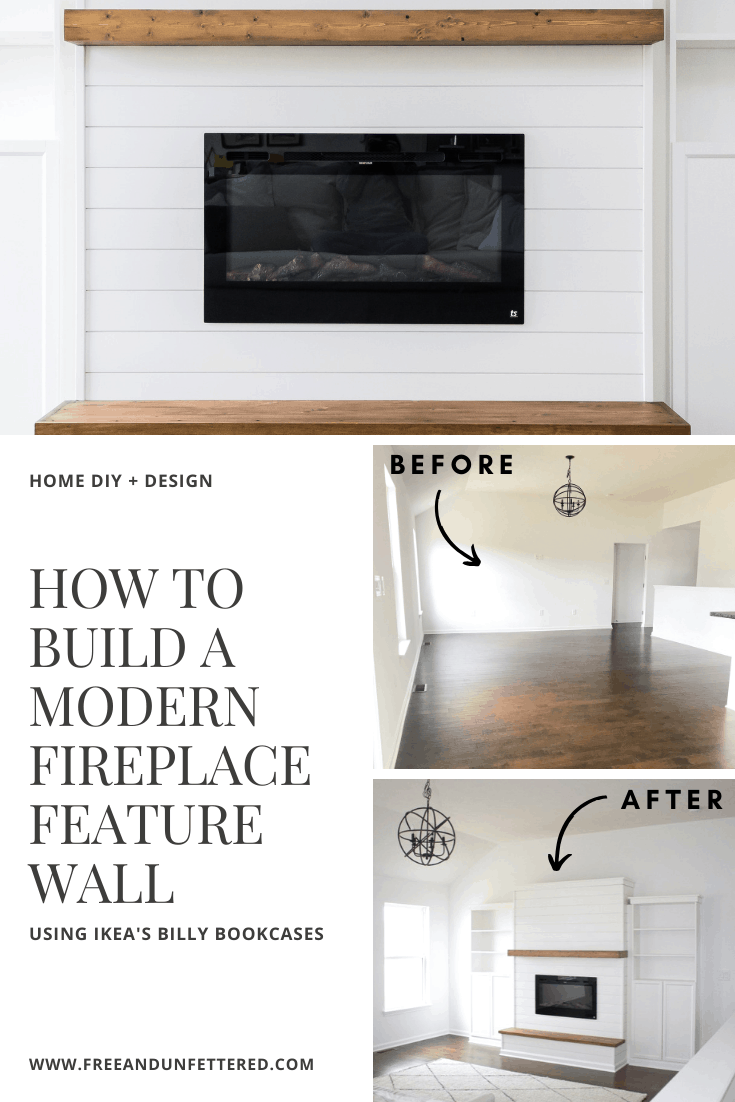
DIY Electric Fireplace with Built-In Bookshelves
Create some cozy in your home this year by building a DIY Electric Fireplace. This beginner-friendly woodworking project cost us roughly $800 dollars to build. If you want to build an electric fireplace wall with a mantel and built-in shelving, here’s a complete step-by-step tutorial for you!
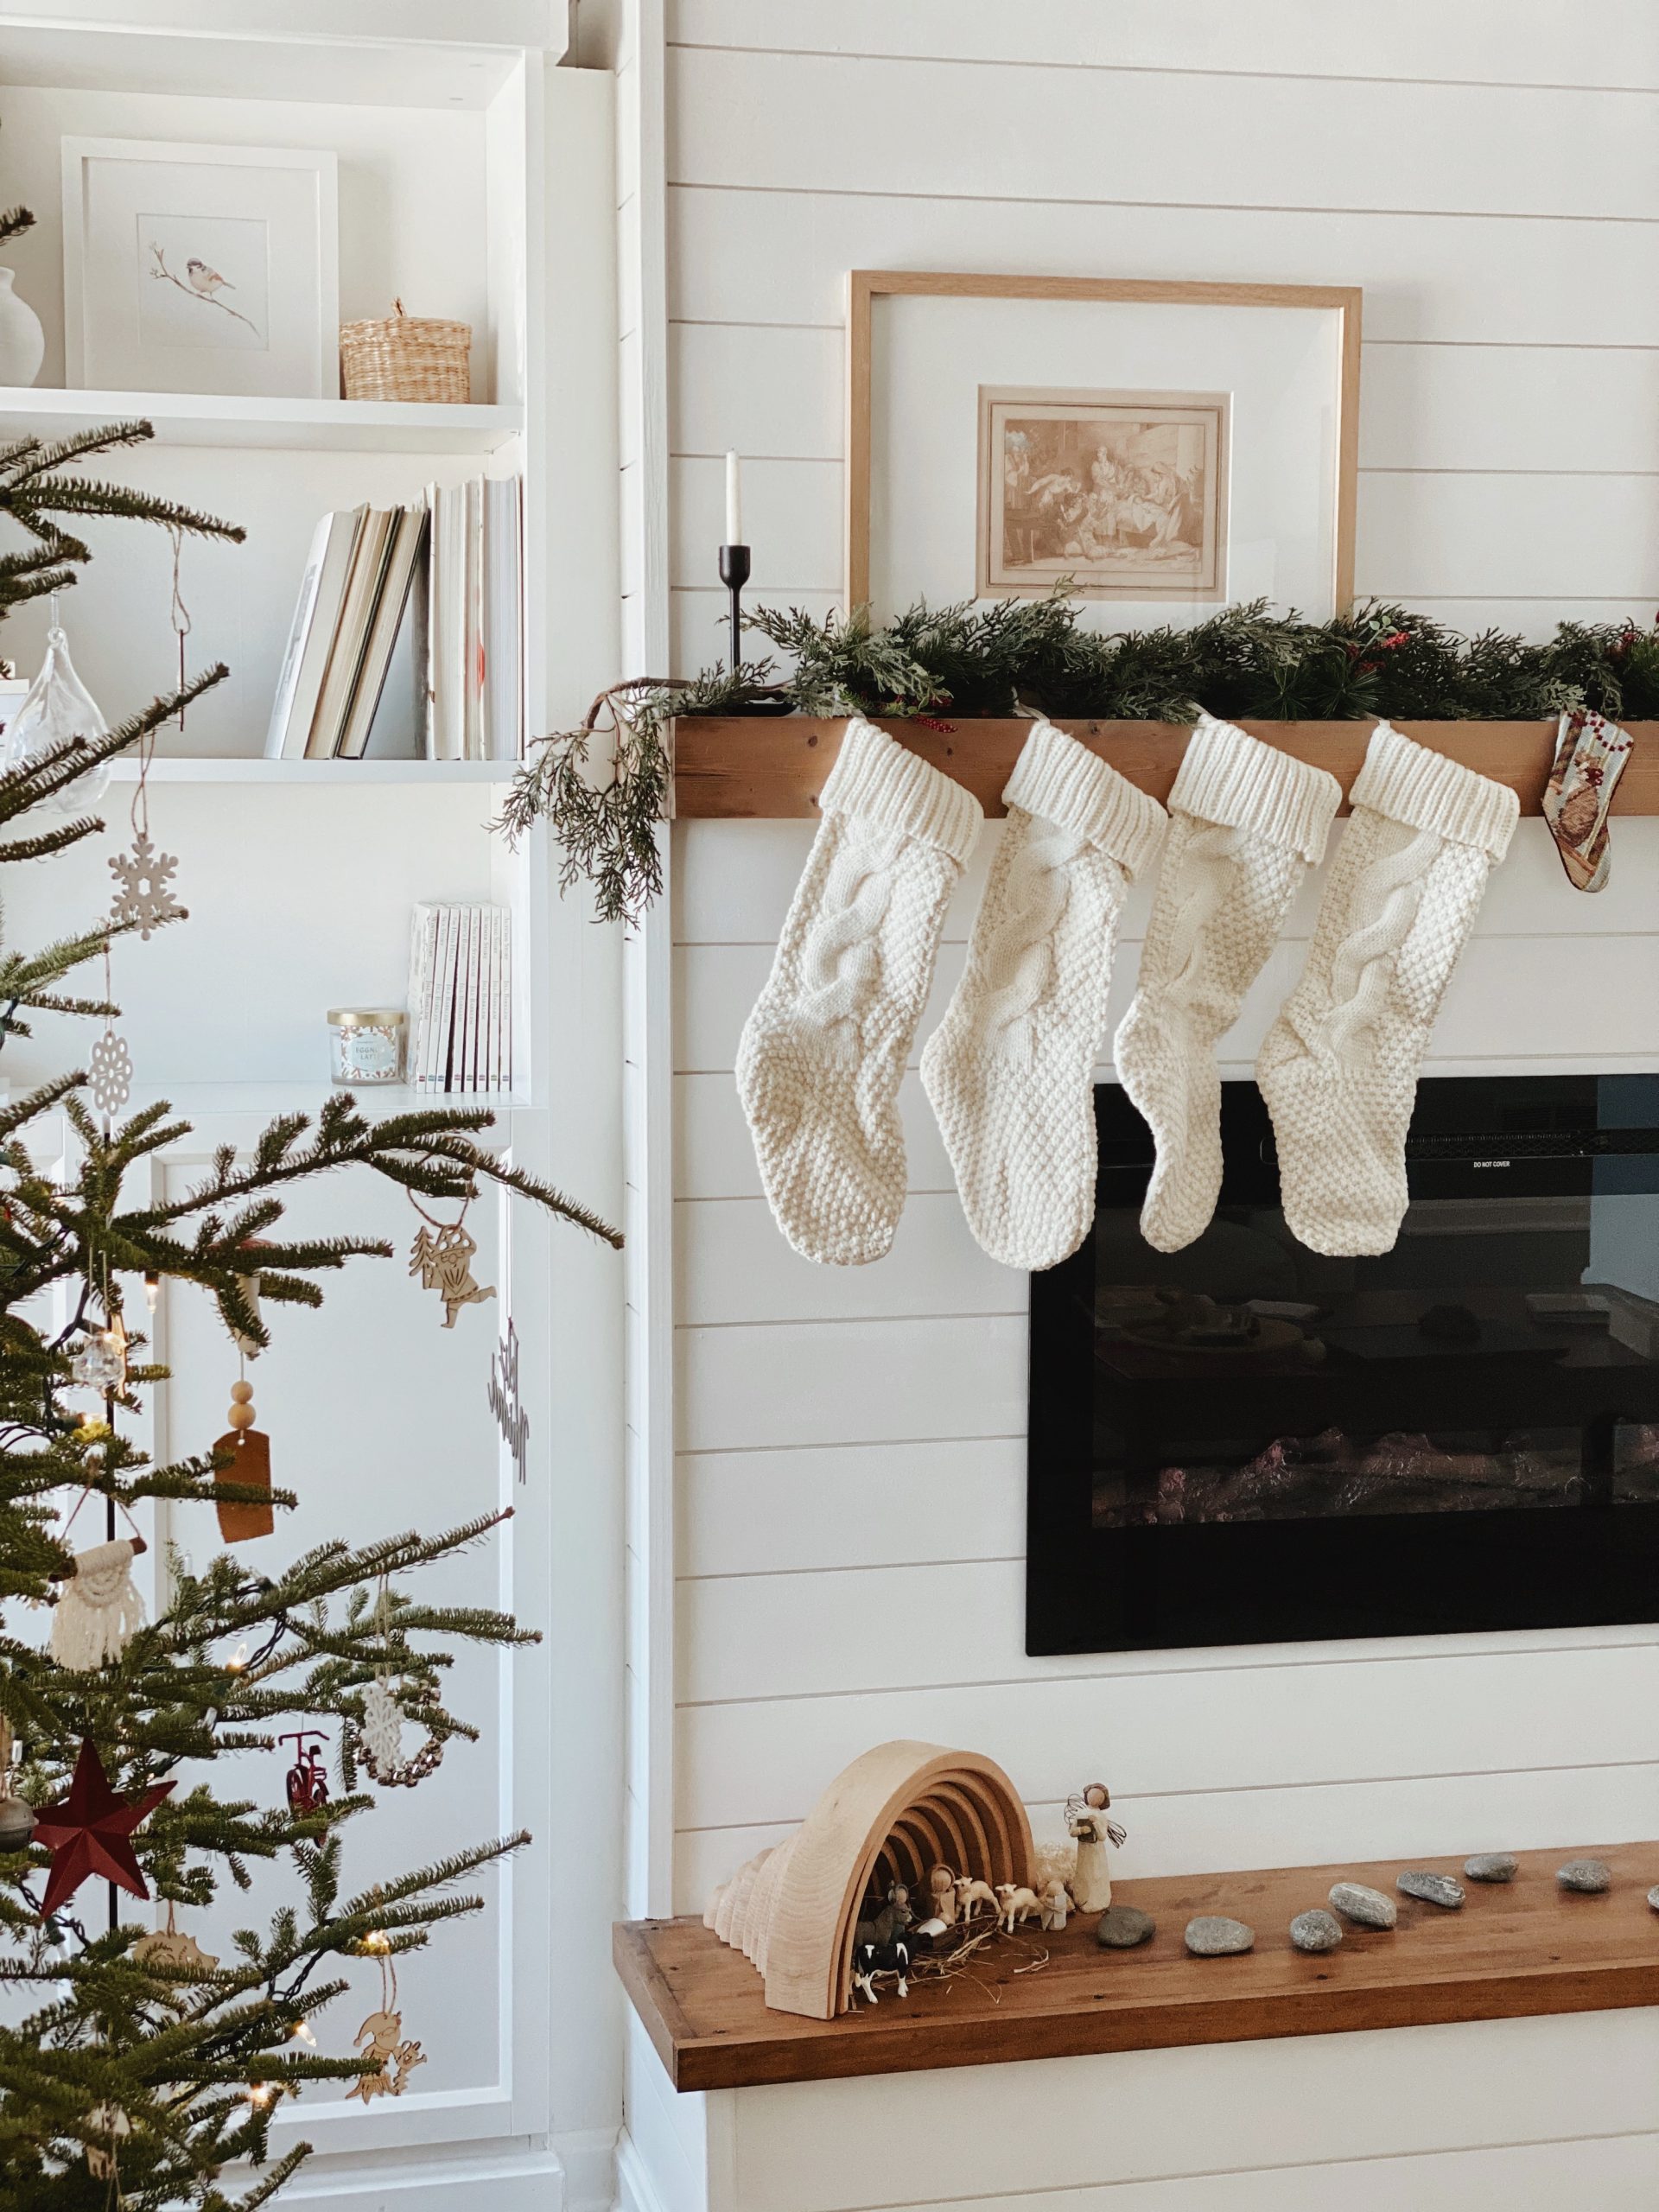
When we began our house hunt, I dreamed of finding a home with a fireplace and mantel. Okay, honestly, at least just a mantel because I really wanted to be able to hang our Christmas stockings on it and decorate it seasonally throughout the year.
But when we finally settled on a house it ended up being a basic, builder-grade home. Don’t get me wrong, though — we love it because it’s located in a great school district and there’s lots of other small children in our subdivision, and it has pretty much everything else we were hoping to find. Plus, it’s far enough away from the city where it feels a little bit country.
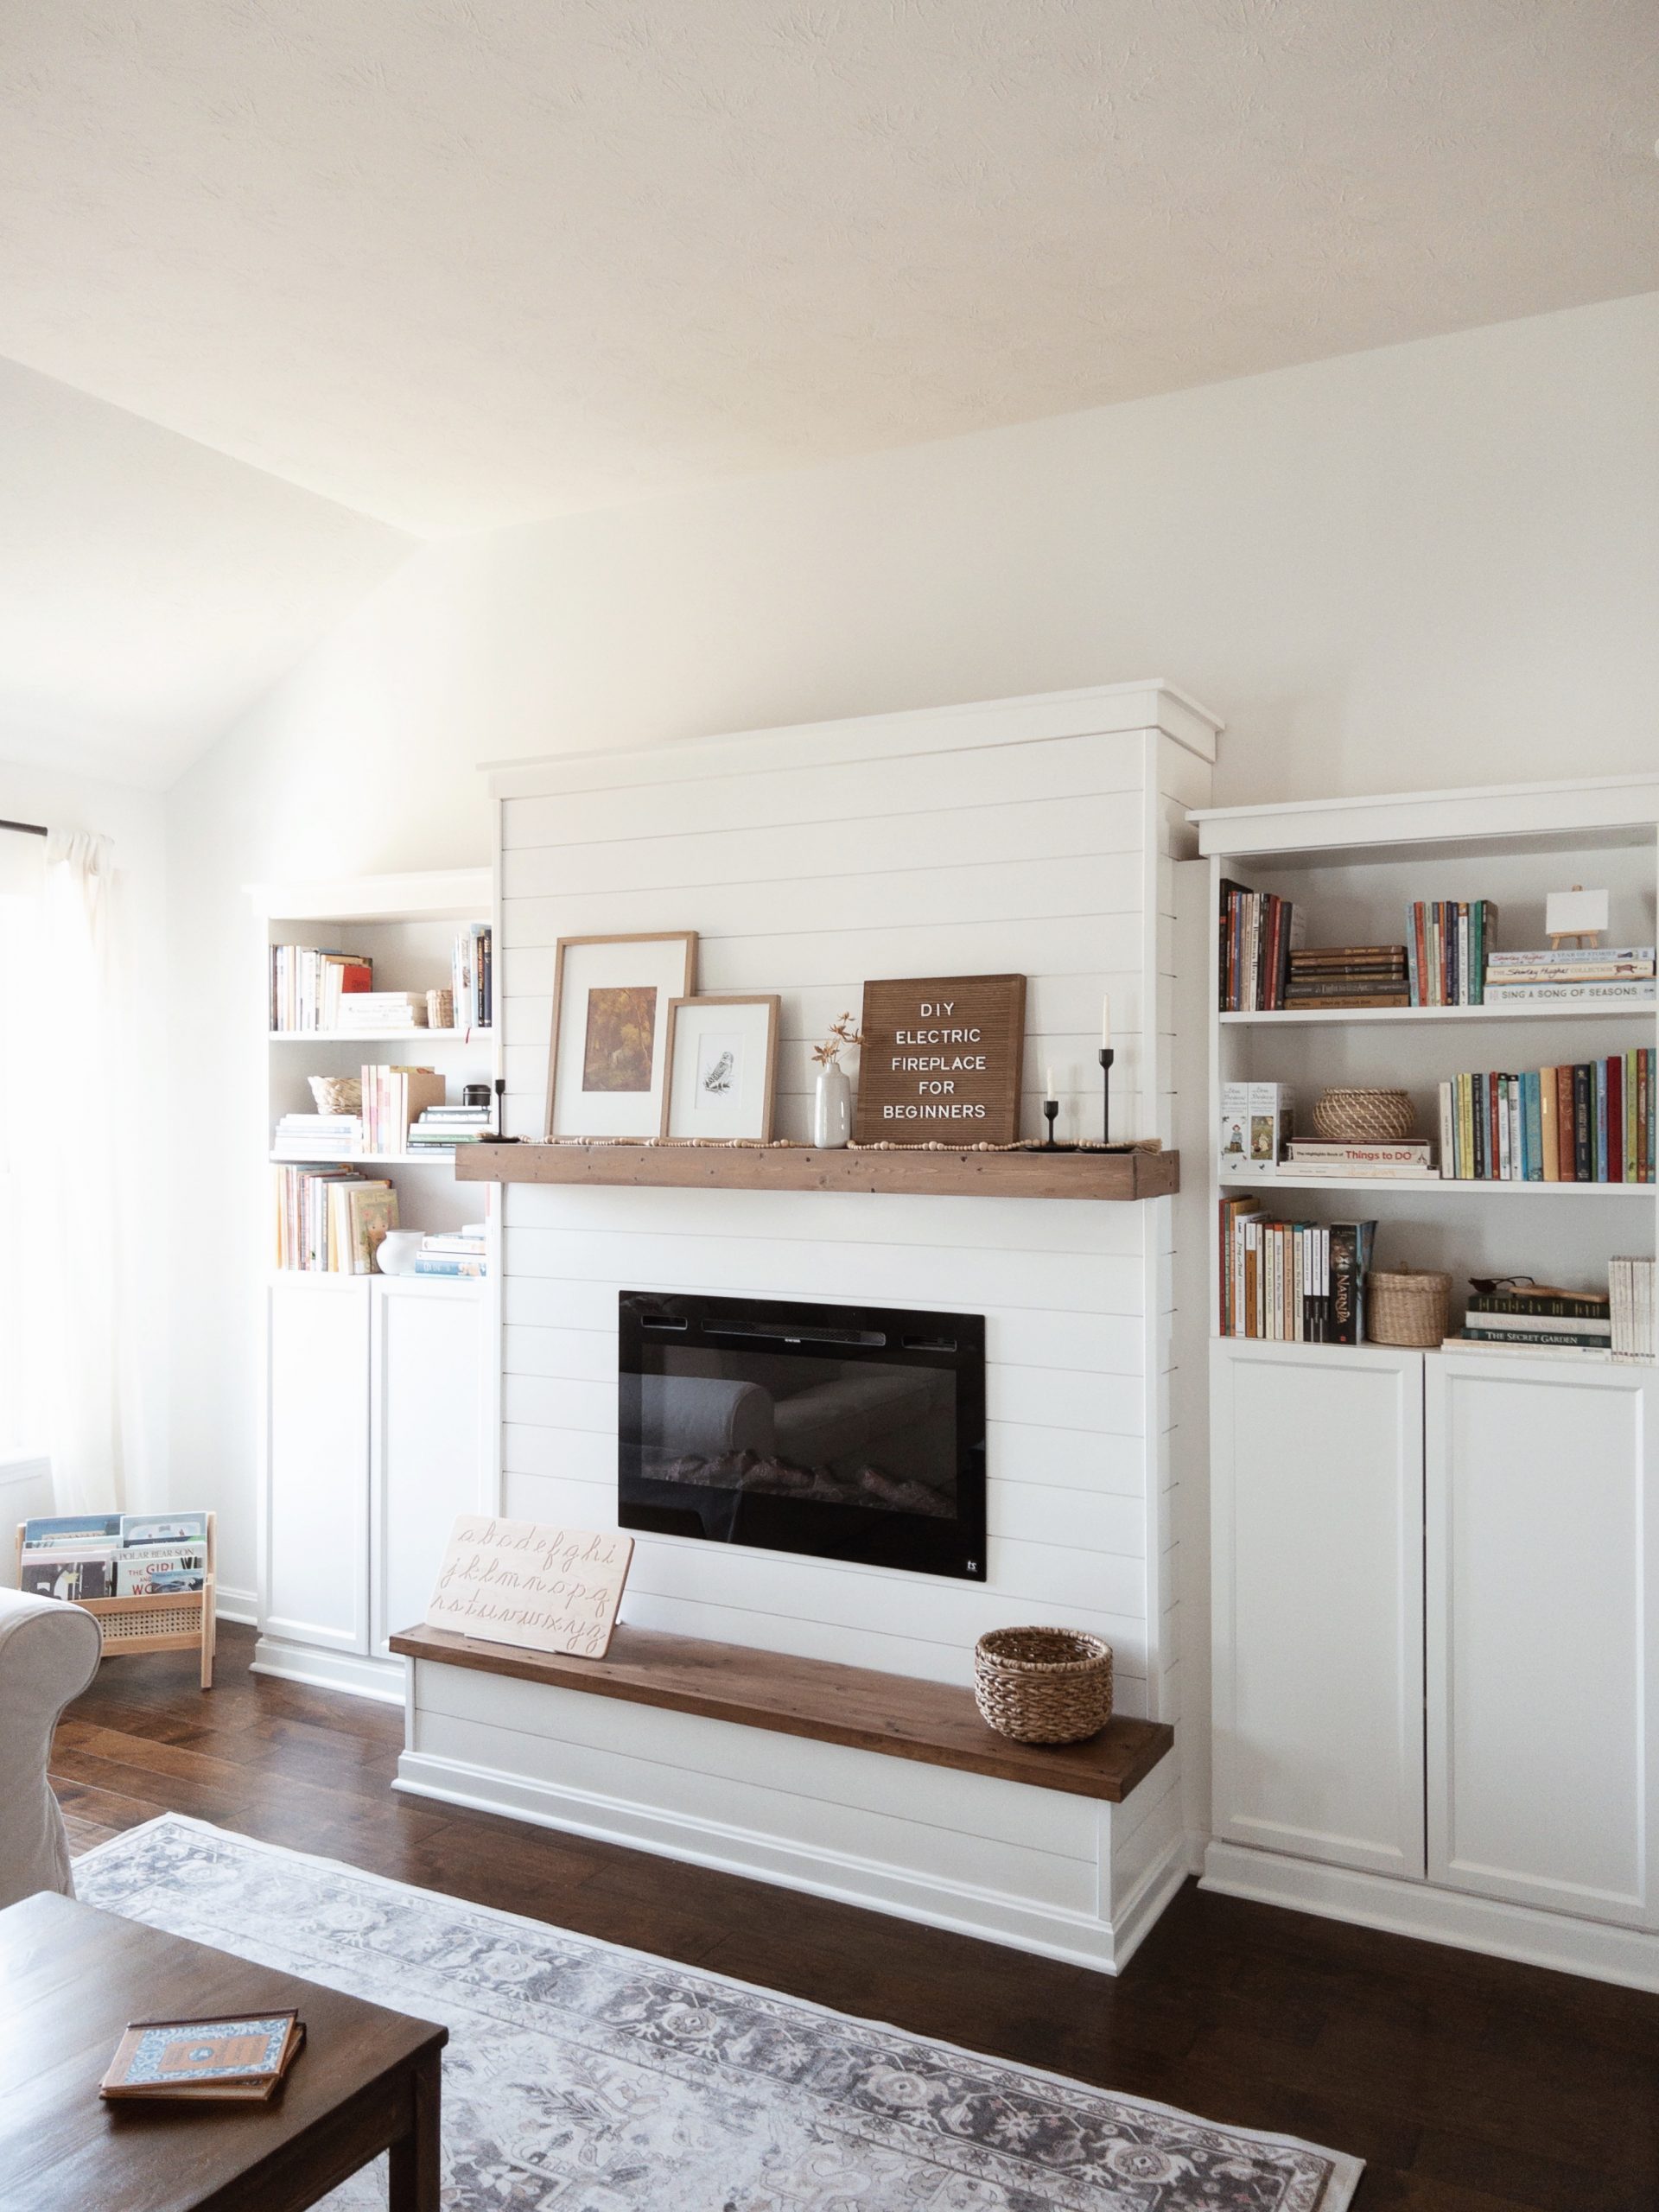
So shortly after moving in, my husband and I began to make plans to build our own fireplace with mantel. With 10′ foot ceilings and an open floor plan and white walls, let’s just say we needed something on one of those walls. We began sketching our plans, searching Pinterest for inspiration, and shopping around for supplies.

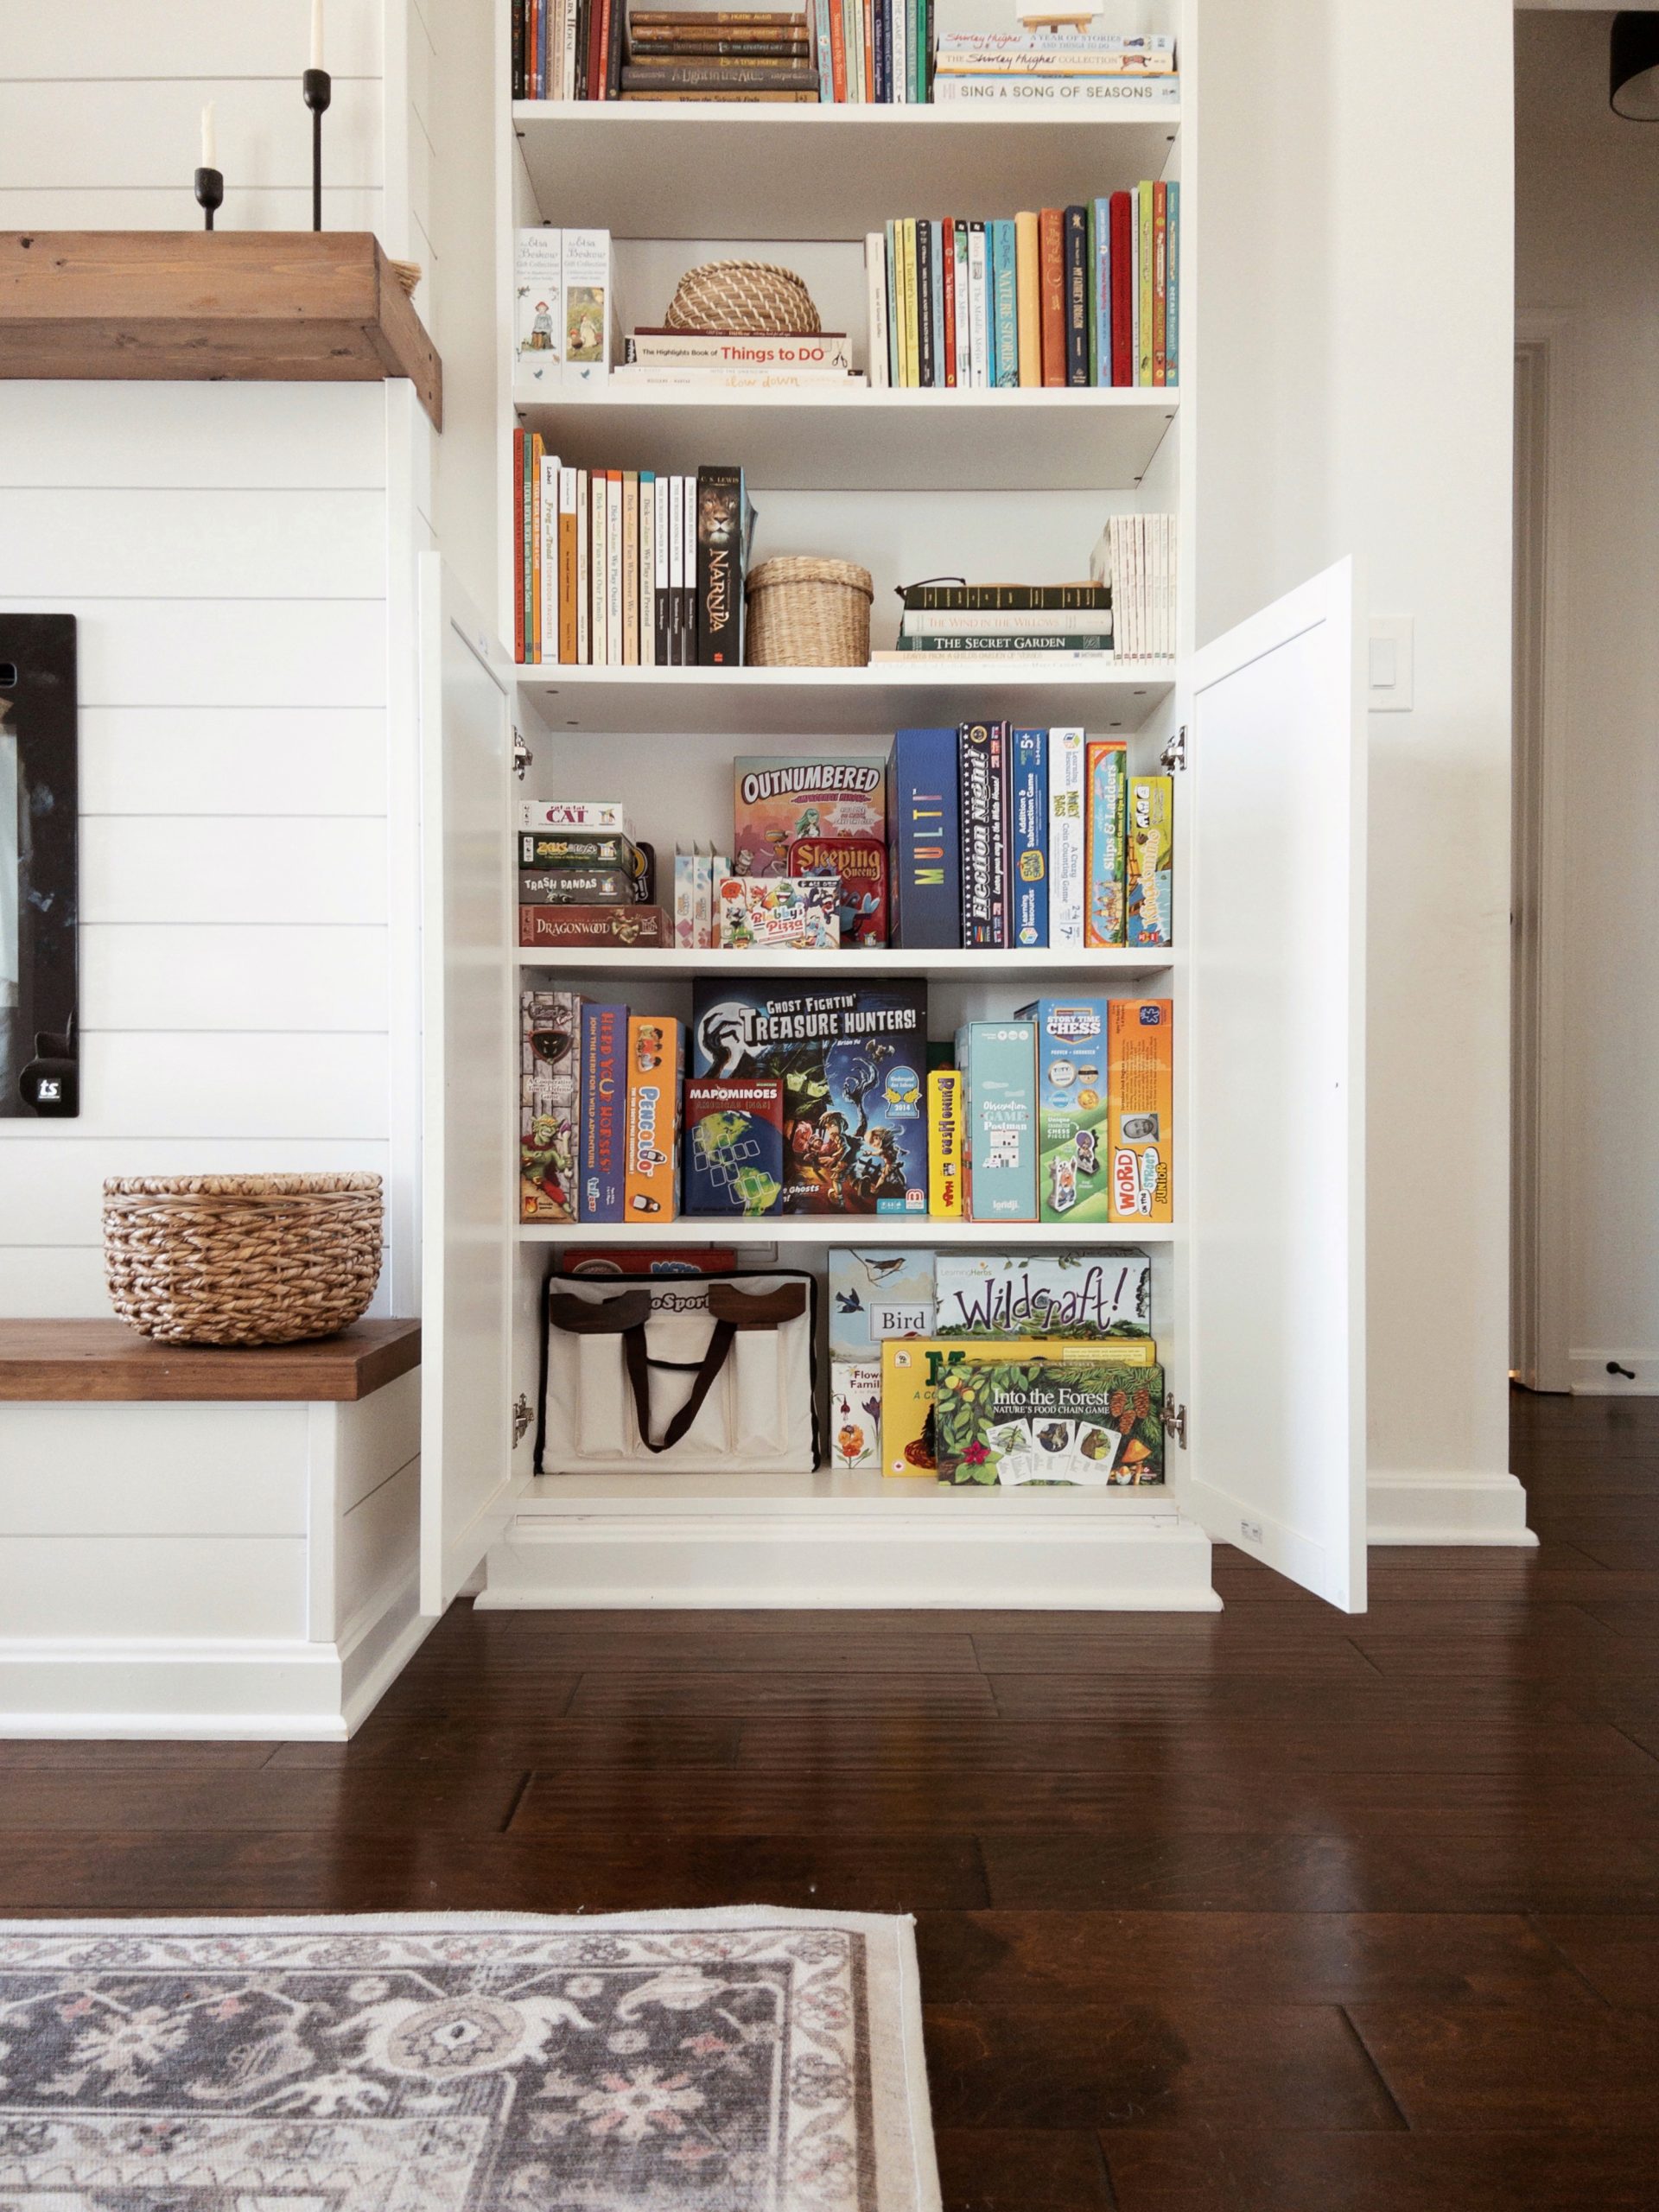
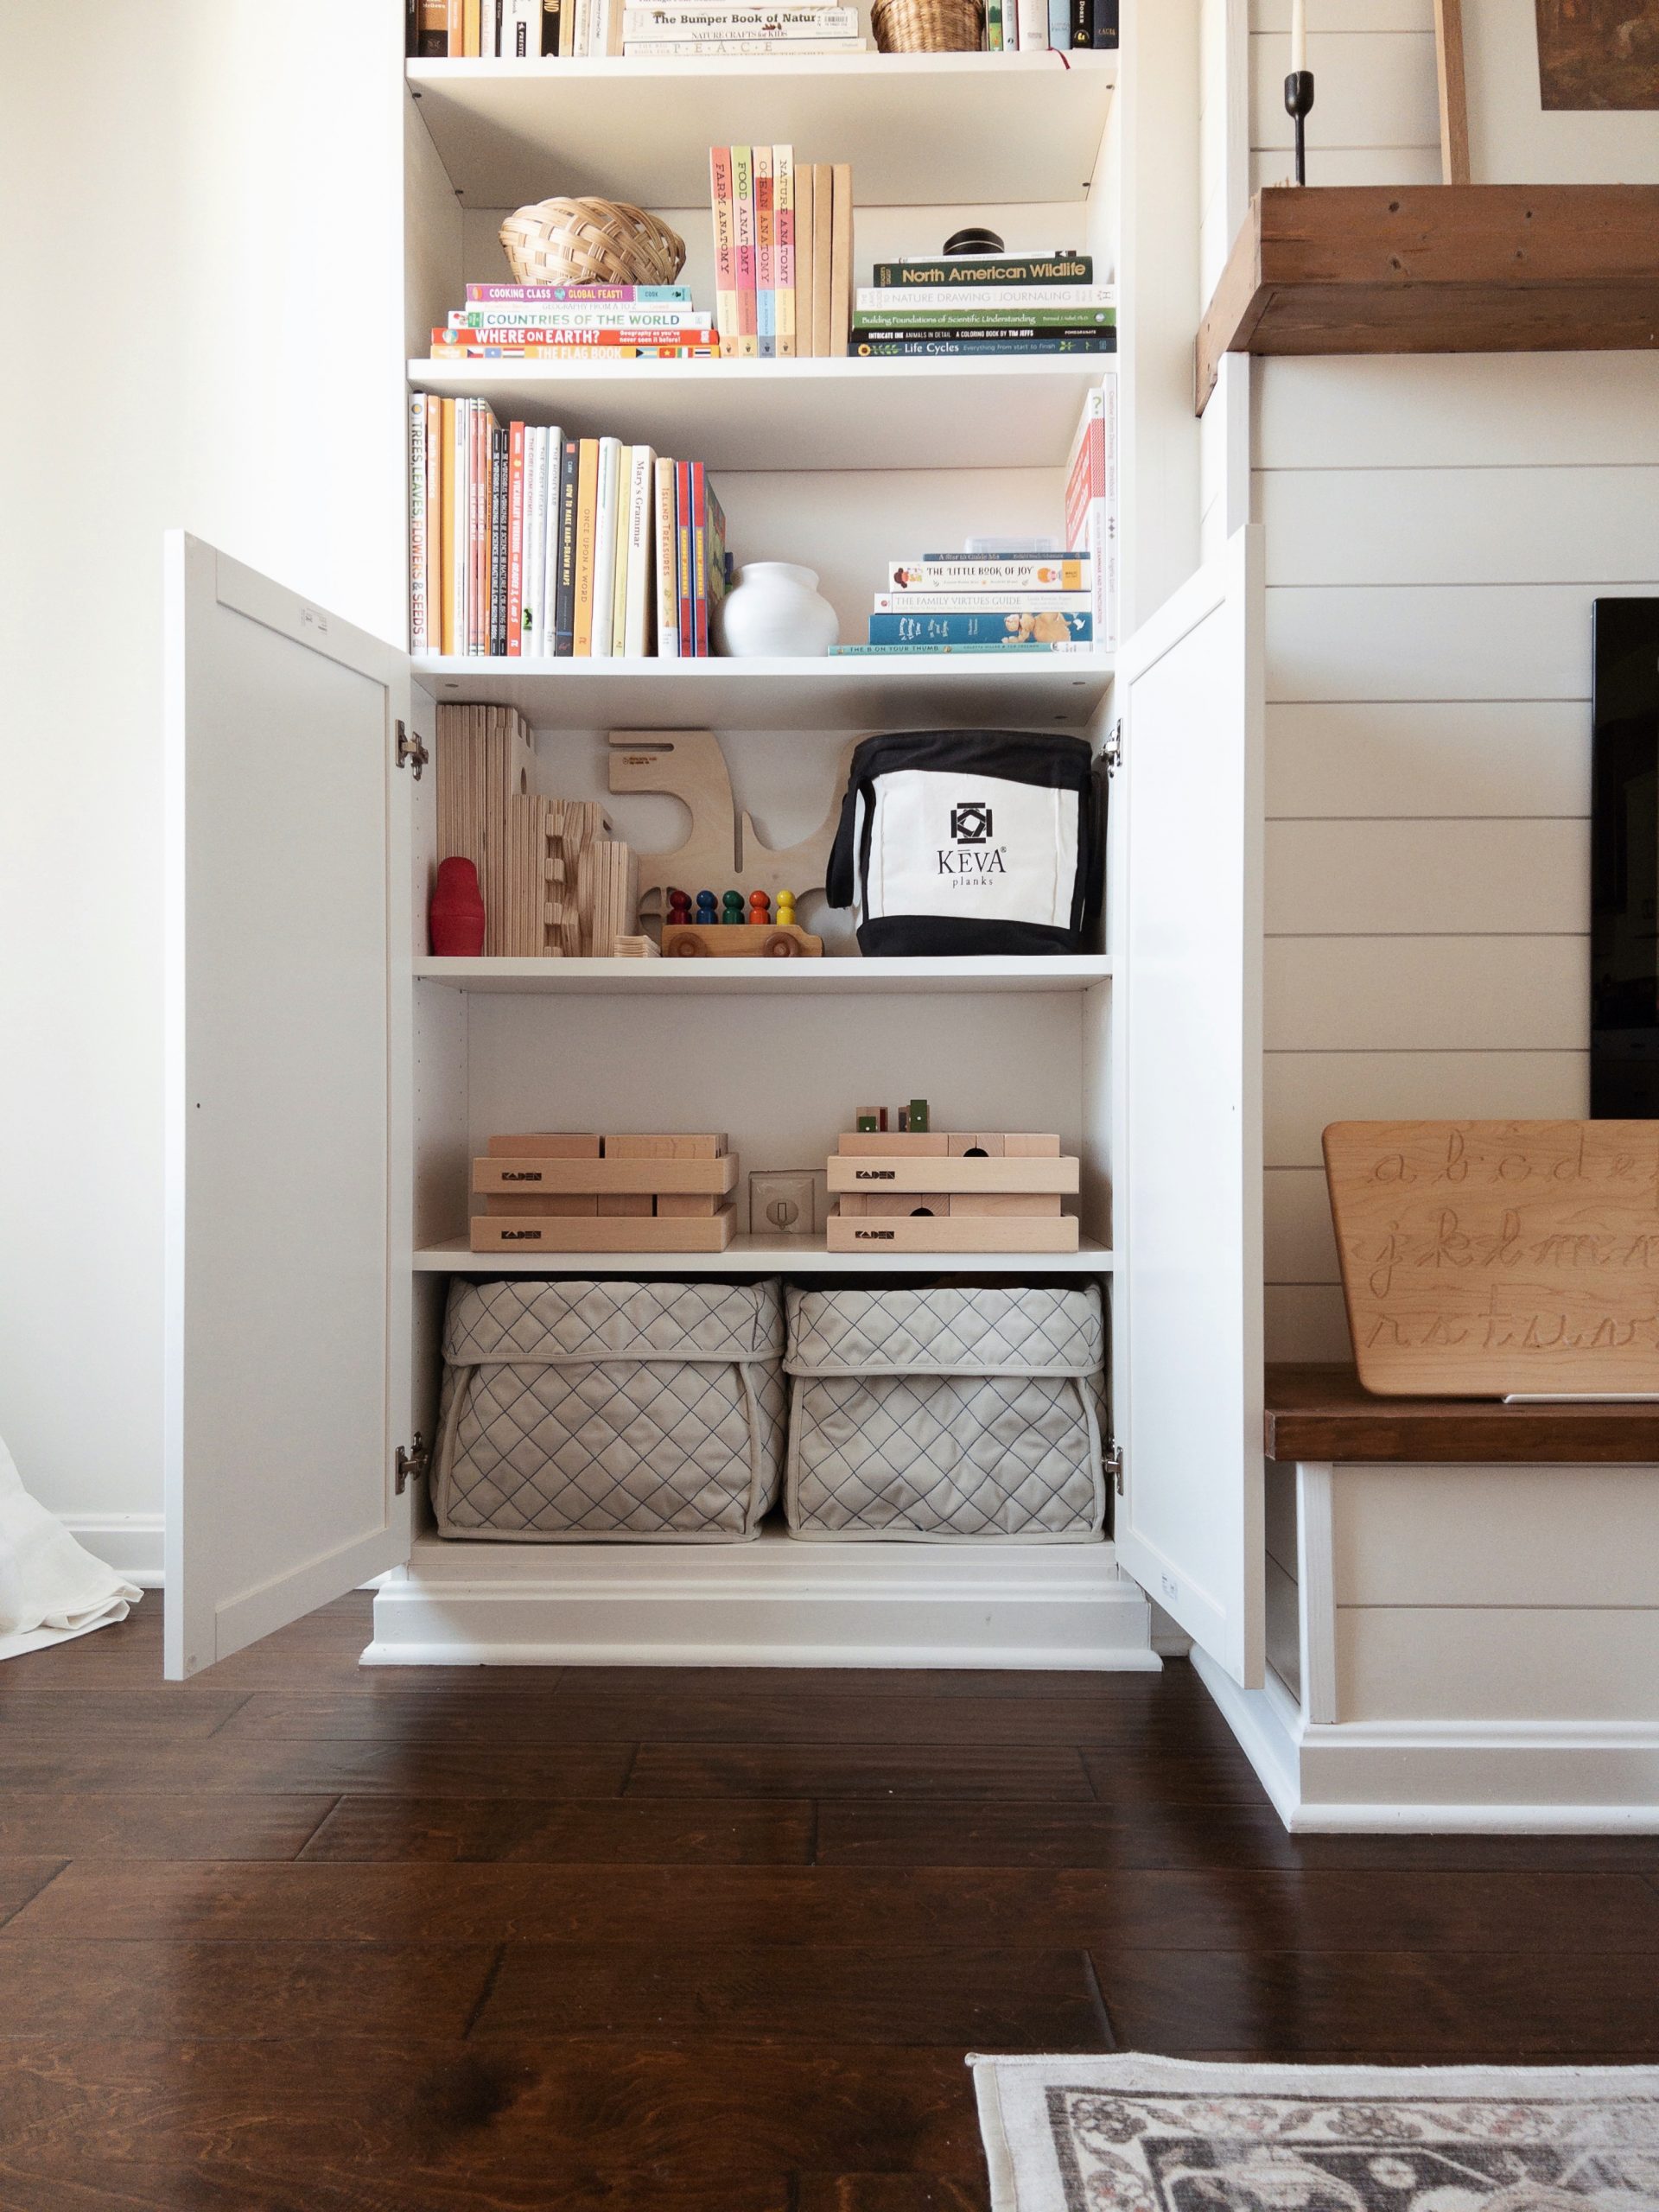
We opted to add Billy bookcases from IKEA on each side of the electric fireplace surround.
As a result, we’re able to keep our family’s favorite board games and our children’s open-ended toys in our living room, all within easy reach.
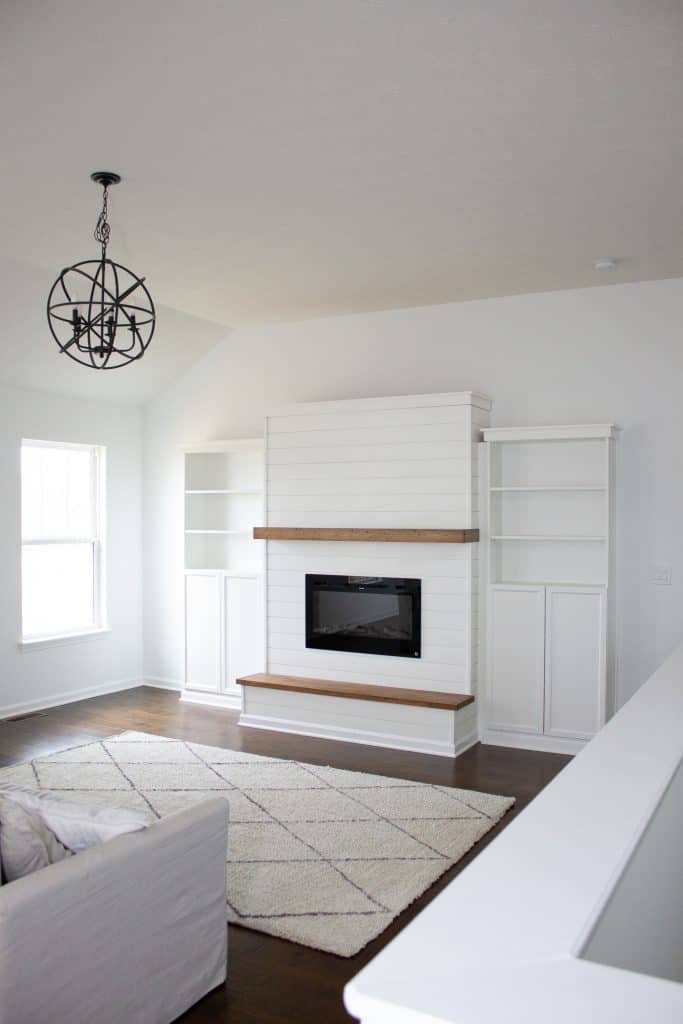
Overall, this project did take us a little bit longer than we initially expected. We ended up changing our initial plans several times. However, I’m beginning to think this might just go hand-in-hand with any DIY project, though. But, hey, at least we’re learning to be flexible, right? Anyway, our DIY electric fireplace is now officially finished! Technically, it’s been completed for about a month, but it takes me awhile to get things posted. #momlife
We’re positively delighted with how our DIY electric fireplace turned out, and we can’t wait to share the complete step-by-step tutorial with you!
DIY Electric Fireplace: The Complete Step-by-Step Tutorial
FAQs about DIY Electric Fireplace
DIY Electric Fireplace: Supplies & Materials

Project Details
- FIREPLACE: 36″ Touchstone Sideline Electric Fireplace
- BOOKCASES: IKEA Billy Bookcase x 2
- MANTEL: DIY Modern Farmhouse Floating Mantel
TOOLS YOU’LL NEED
You’ll need the following woodworking tools to complete this project:
- Cordless Screw Driver
- Compound Miter Saw
- Circular Saw
- Kreg Jig
- Cordless Nail Gun
- Measuring Tape
- Square
- Level
Tips
- Be sure to check for squareness throughout this build. We use a Speed Square and a small level.
- When screwing lumber together, we opt to use wood glue to ensure a stronger bond.
Step 1: Build the Hearth Frame
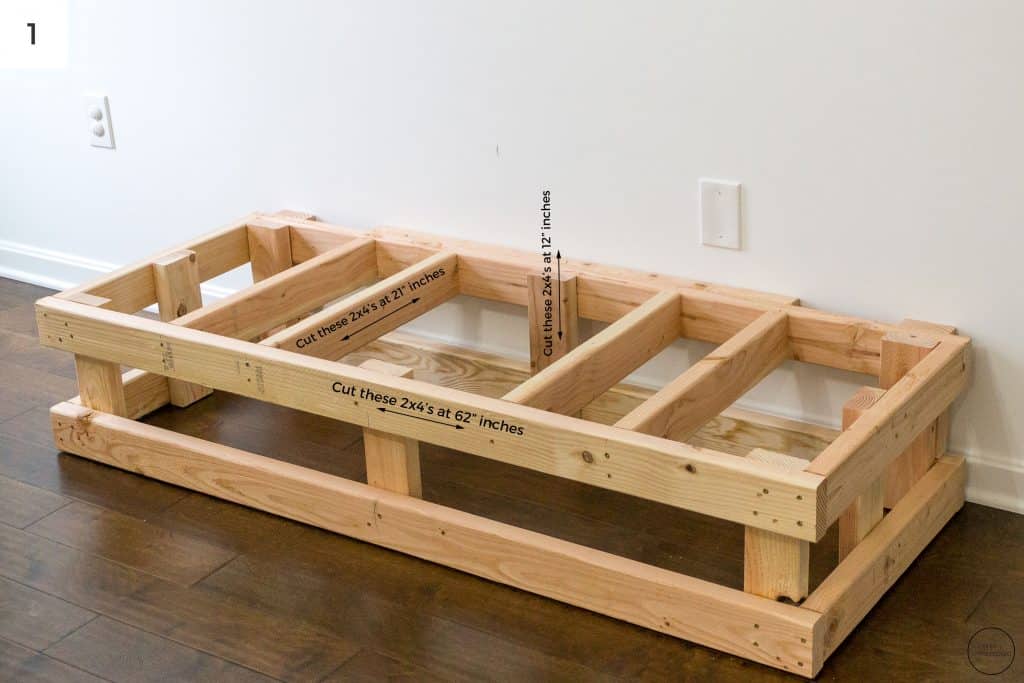
First, determine your desired hearth size. We opted to build one measuring 62″ long by 24″ wide by 12″ high based on our wall dimensions.
Note: I will use these dimensions for the exact cut list, but please be aware that your cut list will deviate from ours if you are using different project dimensions. Just try to keep track of length x width x height going forward if using your own dimensions.
Next, cut (4) 2×4’s at 62″ inches. These will serve as part of the frame for the box you are building.
Then cut (8) 2×4’s at 21″ inches. These will be attached to the 62″ 2×4’s to create the frame.
Cut (8) 2×4’s at 12″ inches. These will serve as the vertical portion of the hearth.
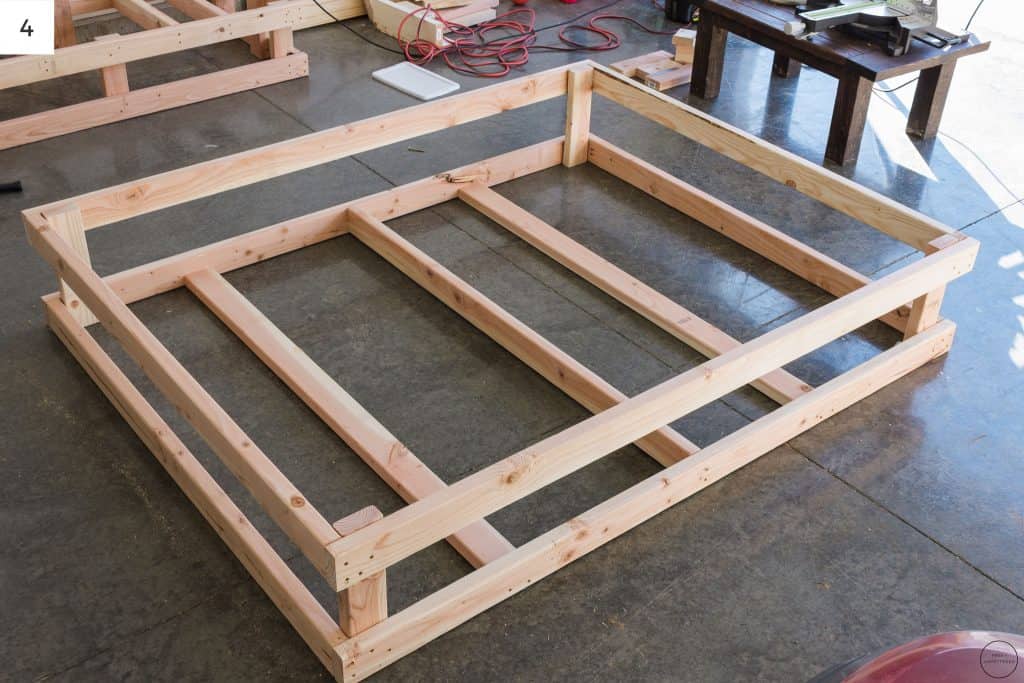
Using the picture below for reference, assemble the hearth frame using screws.
Step 2: Build the Electric Fireplace Surround
All right, now it’s time to begin building the frame for the electric fireplace surround. This frame will sit on your hearth box and attach to your wall.
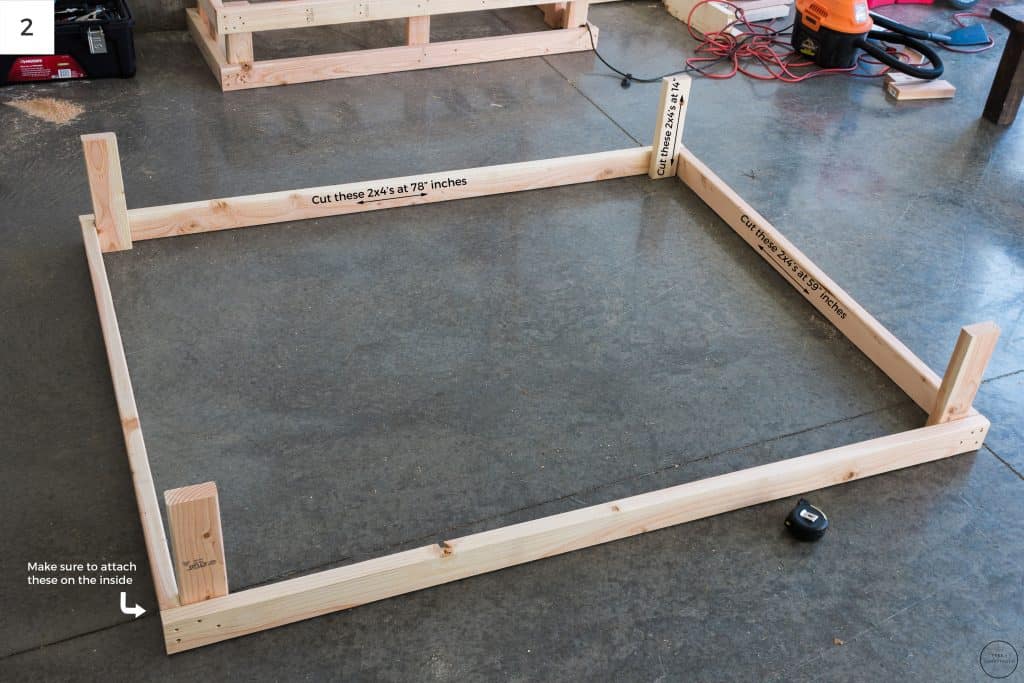
Cut (4) 2×4’s at 78″ inches. Once assembled, the total height of the fireplace feature wall will be 90″ inches. Remember, the electric fireplace surround frame will sit on top of the hearth frame. The hearth frame measures 12″ high. Depending on the crown molding you choose, your height may be slightly different than ours.
Cut (4) 2×4’s at 59″ inches. Attach these to the (4) 2×4’s at 78″ at the top and bottom to create two large rectangular boxes.
We decided to make the build-out part of the fireplace feature wall be at 14″ inches depth. Ultimately, this gave us a 10″ inch hearth. Therefore, we cut (4) 2x4s at 14″ inches and attached them between the (2) 78″ inch x 62″ rectangular frames we built in the previous step.
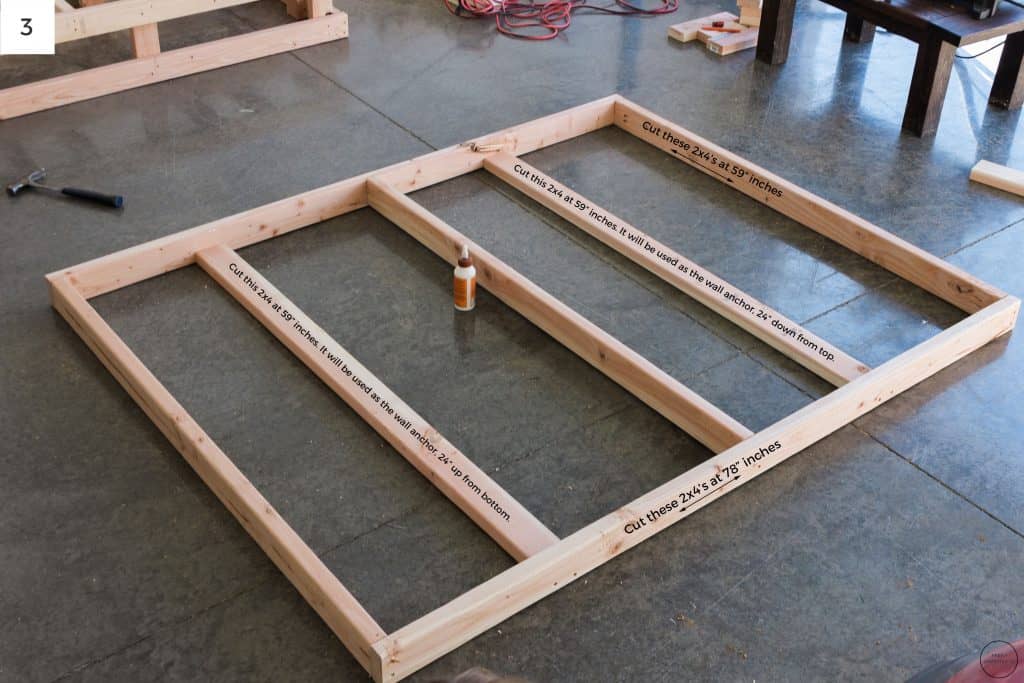
Next, cut (2) 2x4s at 59″ inches and attach to the back of the box frame, 24″ inches up from the bottom and 24″ inches down from the top. These will be used to secure the entire box to the studs in your wall. Be sure to note their orientation in image (3) below.
Then cut an additional (1) 2×4 at 59″ and attach to the back of the box, directly in the middle. This will help provide more structural support. Note its orientation in image (3) below as well.
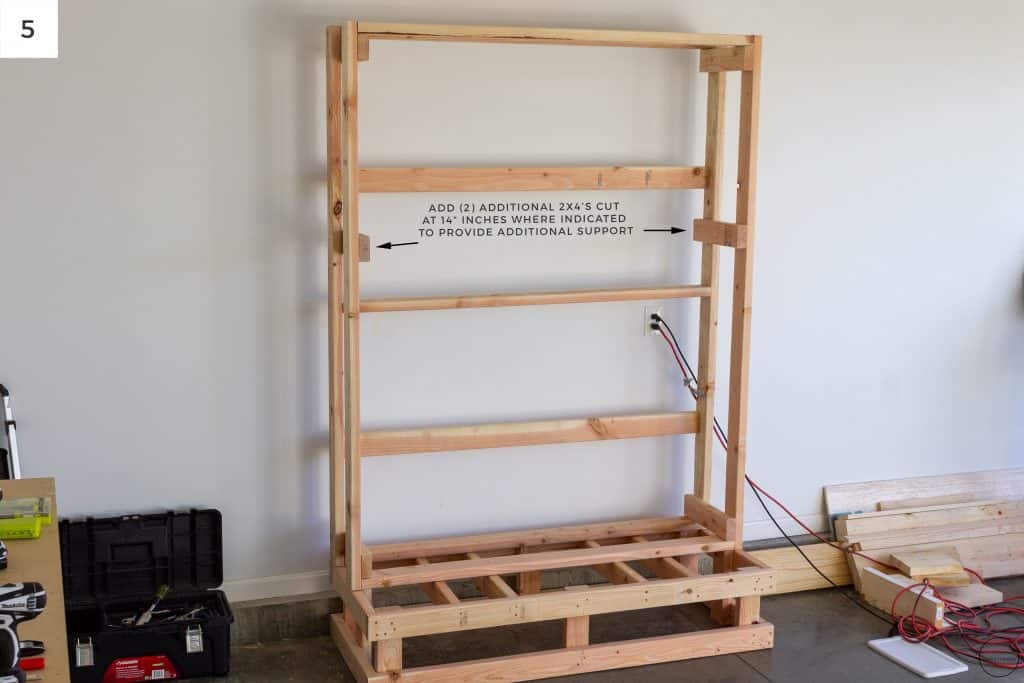
Once we sat the box frame on the hearth box, we decided to add an additional (2) 2×4’s cut at 14″ inches to provide additional support. You can see their positioning in the image below.
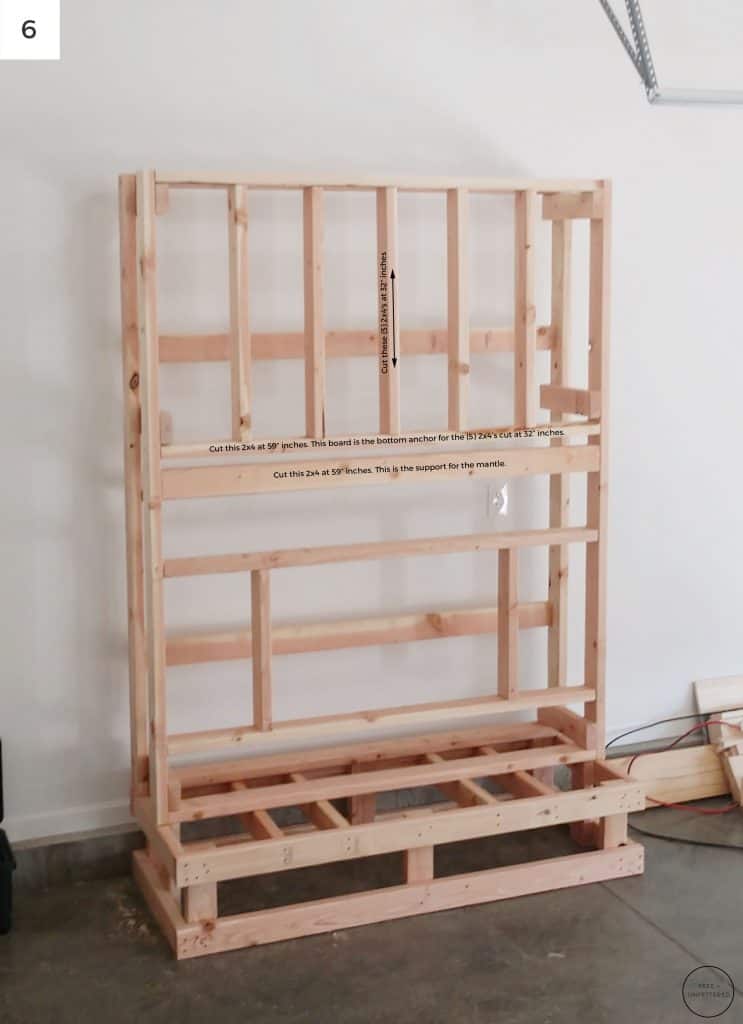
Next, we opted to add additional framing to the part of the box above where the mantle will be placed in case we decide to mount a television in the future. To do this, we cut (5) 2×4’s at 32″ inches.
Cut an additional (1) 2×4 board at 59″ inches to serve as the bottom anchor to which the aforementioned boards attach. Be sure to note the positioning of this board in image (6).
We decided to place the mantel at a height of 53″ inches. So we then cut (1) 2×4 at 59″ inches and attached it onto the frame at 41″ from the bottom.
Step 3: How to Build the Electric Fireplace Insert
Next, we’ll tackle the frame that your electric fireplace will be inserted into. Here’s the exact electric fireplace we chose for this project:
36″ Touchstone Sideline Electric Fireplace
We selected the 36″ inch wide Touchstone Sideline Electric Fireplace because it had the vent on the front, making for a really simple installation.
Touchstone offers several different electric fireplace sizes if you opt to change the dimensions of our project build.

When building the frame that the 36″ inch wide Touchstone Sideline Electric Fireplace will attach, the actual hole will need to measure 32.75″ inches wide by 20.5 inches tall. Therefore, we cut (2) 2x4s at 59″ inches and (2) 2x4s at 20.5 inches to create our fireplace frame.
Note: You will need to have an electrical outlet on the wall behind your fireplace. We opted to have a separate circuit installed by an electrician when our home was being built for an additional $50 dollars.
Next, we centered the frame between the top of the hearth and the bottom of the mantel and attached with screws.

Step 4: Attach the Electric Fireplace Surround to Wall
Now it’s time to mount everything to the wall. Mark the center of the wall and the center of the hearth box.
At this point, you’ll want to remove the baseboard that will be directly behind the hearth so your build-out will sit flush against the wall.
First, we’ll attach the base using 4″ lag bolt screws directly into your wall studs. We opted to place 1.5″ washers on the screws to add extra stability. Once centered, mark wall studs and pre-drill holes into the 2×4’s on your frame before attaching to wall to ensure your boards will not split. We opted to use (2) lag bolt screws, one on each side, to secure the hearth base to the wall.
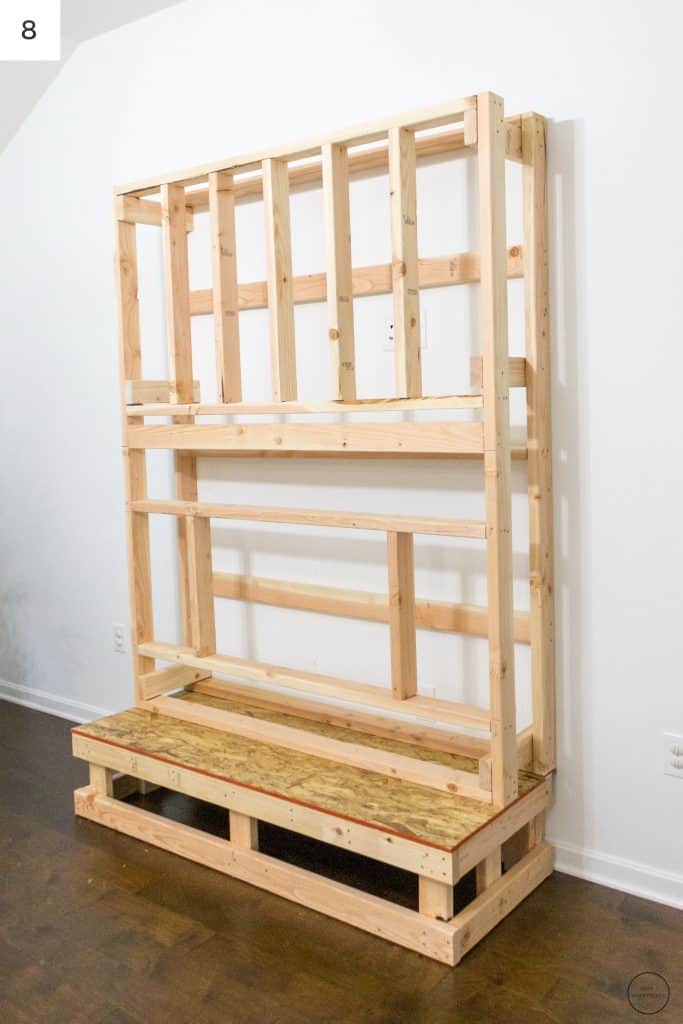
Next, cut plywood to fit the top of the hearth base and attach with screws.
Then carry the top portion of the build-out frame and place on top of base, sitting flush with the base and wall. This step will require two people. Screw the top portion of the frame to the hearth base with 6-8 screws. Next, attach it to the wall using the 4″ lag bolt screws, two at the top and two at the bottom, ensuring you are placing them into the studs in your wall.
Step 5: Encase the Electric Fireplace Surround
Almost there! Now it’s time to attach whatever subsurface you are choosing to use. Since we decided to use shiplap as our finishing material, we were able to simply encase the frame with plywood.
If you choose to use a stone veneer like AirStone, you’ll need to use an approved interior substrate like concrete board or drywall.
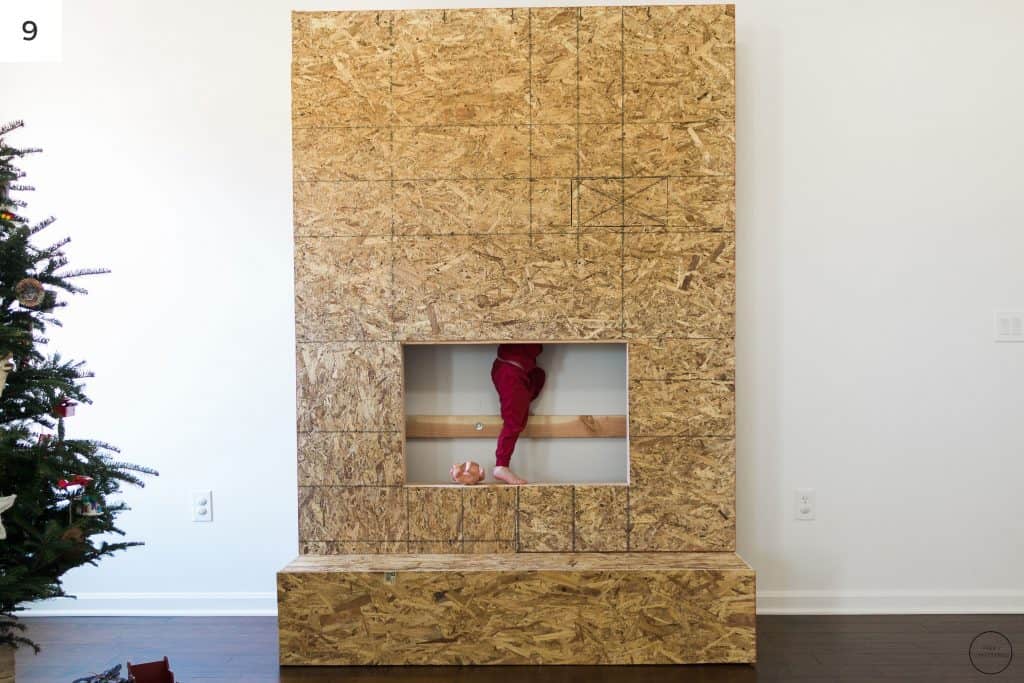
Note: If you have small children and/or cats, you’ll want to go ahead and apply your finish material and mount your fireplace as soon as possible once you’ve brought your electric fireplace surround into your home and attached it to the wall. If not, you should expect lots of climbing to occur. My kids were devastated once we finished the build since they no longer had access to their makeshift indoor climbing gym.
Once we had encased the entire frame with our substrate surface, we opted to go ahead and hang the fireplace mantel. It’s also a beginner-friendly DIY project that really saved us a ton of money over buying a pre-made one.
DIY
How to Build a Fireplace Mantel
Build a fireplace mantel following our complete step-by-step tutorial.
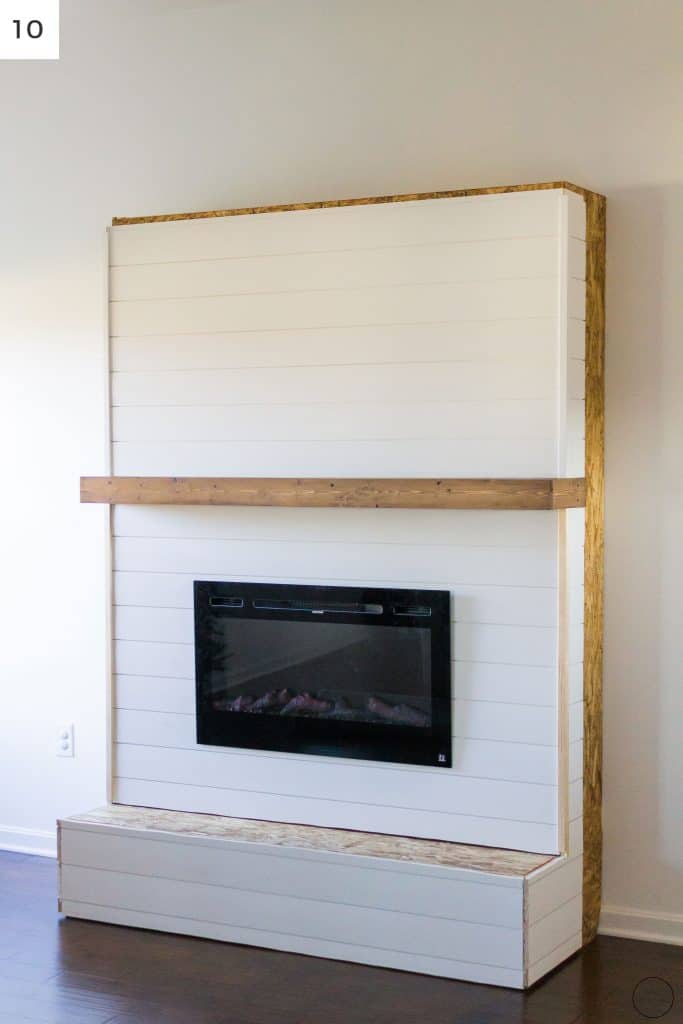
Step 6: Install Shiplap on the Electric Fireplace Surround
Once the mantel’s been attached, it’s time to install the shiplap. You’ll notice in the picture below that we didn’t take the shiplap all the way to the wall. This is because we knew we’d be attaching our bookcases to each side. If you’re not attaching bookcases to the electric fireplace surround, then you’ll want to go ahead and run the shiplap all the way to the wall for a clean finish.
After marking where the studs were located, Eric simply cut each piece of shiplap to size and used his Ryobi One cordless nail gun to attach the shiplap directly to the plywood substrate.
We were actually really, really lucky at this point because we had originally intended to install AirStone below the mantel. However, once we purchased the AirStone and brought it into the house it just didn’t give us the vibe we were looking for.
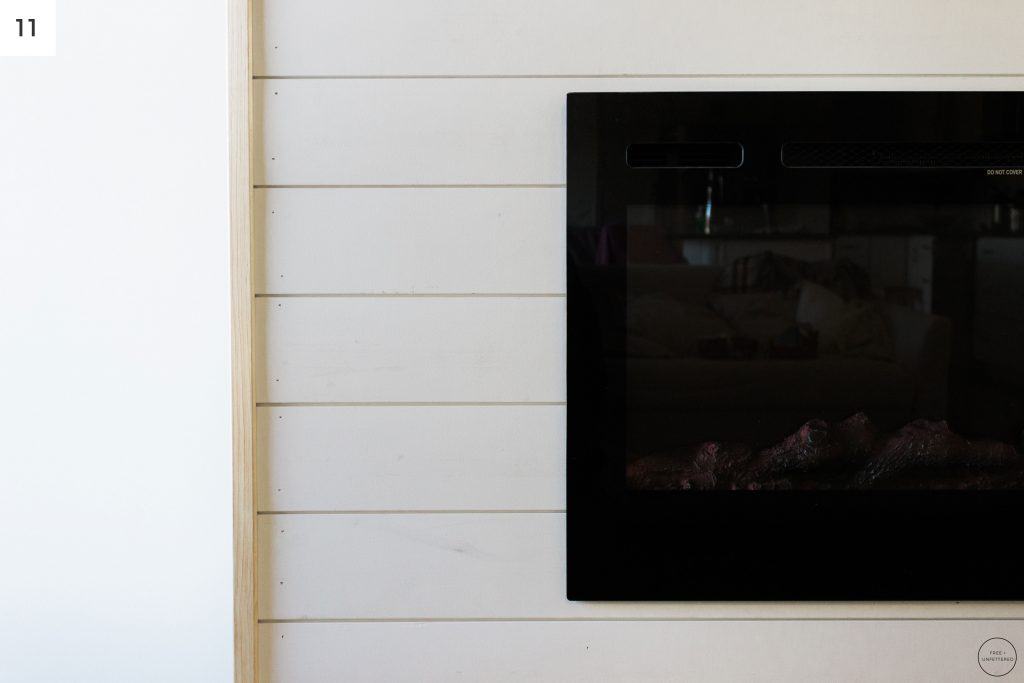
I was concerned the shiplap would hit at odd places, but thankfully we were able to position the boards in such a way that the lines ended up being clean and even, for the most part.
Hence, please be sure to pre-measure for your shiplap and make whatever allowances need to be made in order to keep your lines consistent.
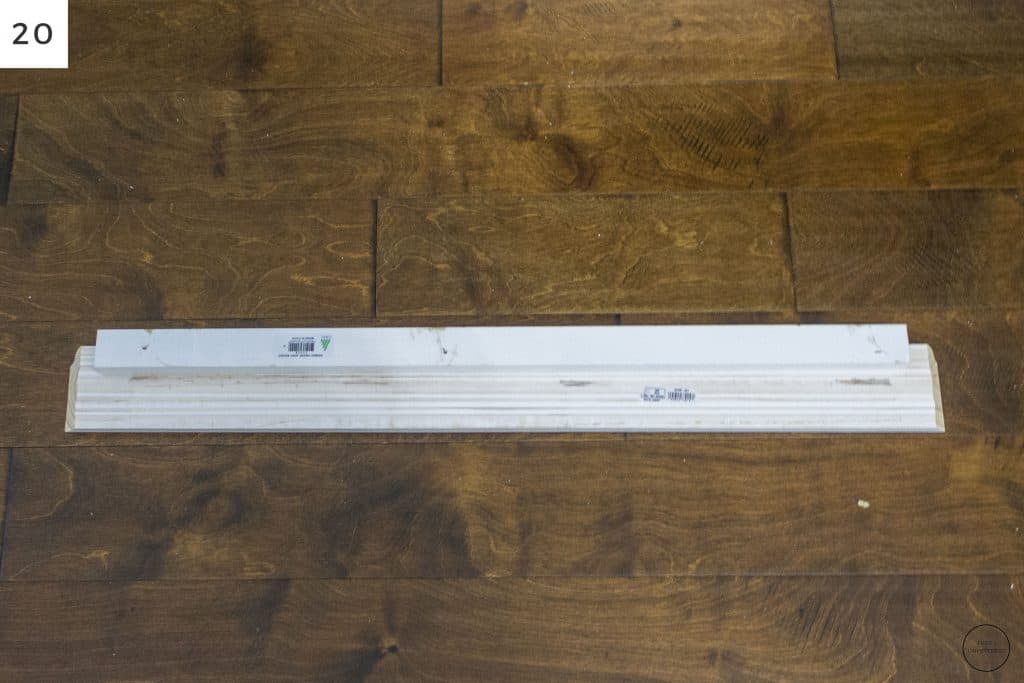
Next, we added some thin corner trim to the front corners of our shiplap.
Step 7: Install Electric Fireplace
Once you’ve finished installing the shiplap, you can go ahead and mount your electric fireplace onto its frame. Congrats! You’ve completed the most difficult part of the build at this point. Now all that’s left is building the hearth and attaching bookcases, if desired.
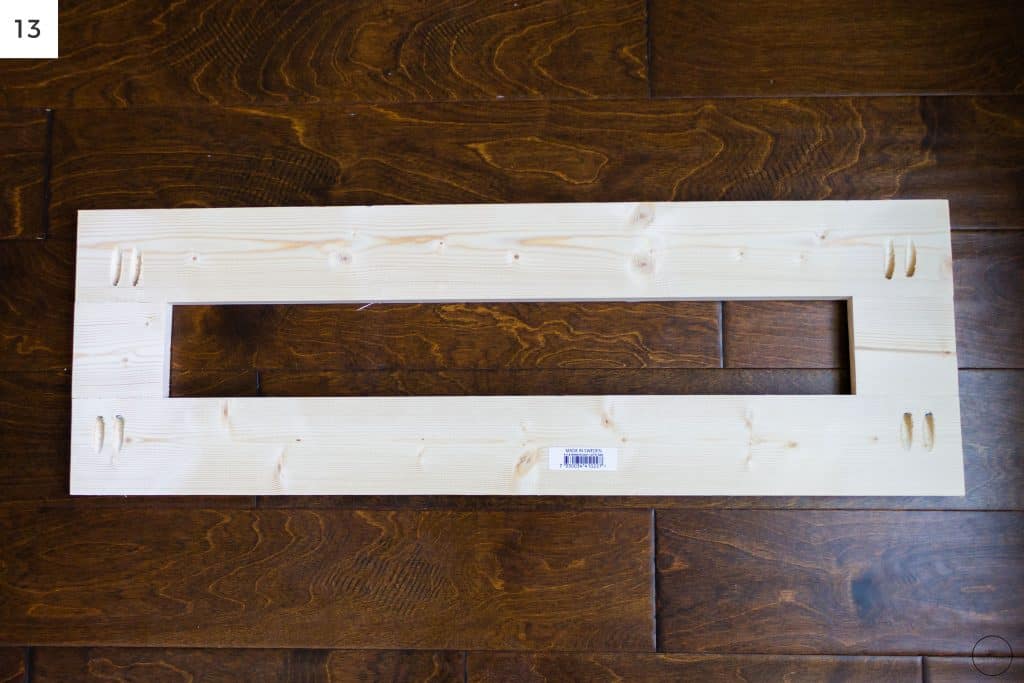
Step 8: Build the Wooden Hearth
Originally, I fell in love with the idea of a concrete hearth. But, alas, it was totally out of our budget, and while there are some DIY’s available that look amazing, Christmas was right around the corner and I wanted a hearth in there ASAP.
I figured since we couldn’t have concrete, why not just mimic the floating mantel? It actually worked out really, really well because we already had a leftover Mastercraft edge-glued pine plank from our DIY Corner Desk project. More importantly, a wooden surface would be completely flat which was important for us as a family since I wanted our children to be able to make use of the hearth in their creative play.

In order to build our wooden hearth, Eric cut the 16″ Mastercraft edge-glued pine plank down to a 12″ depth to fit the hearth. For the length we decided on about an inch overhang on each side.
Then he simply attached some 1×2’s to the sides and the front to create the appearance of a thicker hearth. After a couple coats of stain and poly, we brought it inside and attached it to the plywood base using black screws, mimicking the same hardware used to attach the floating mantle.
Step 9: Attach the Bookcases
Once the hearth was installed, we prepped for the installation of the Billy bookcases from IKEA. Since we wanted the bookcases to look built-in, Eric went ahead and removed the existing baseboard. Then he built a small platform to raise the bookcases up about 3/4″ inch using 1×3’s. Otherwise, once the baseboard was reattached the doors wouldn’t have opened.
He also built the same platforms for the top of the Billy bookcases in order to allow us to attach the crown molding. So if you want to save some time, go ahead and make (4) platforms at once, two for each Billy bookcase.

Once you’ve attached the platforms to the base of each Billy bookcase, it’s now time to install the spacer boards that will sit between the fireplace and the bookcases. Since we wanted the hearth to have a slight overhang on the sides, we needed to space the bookcases further away from the fireplace so the bottom doors would open.
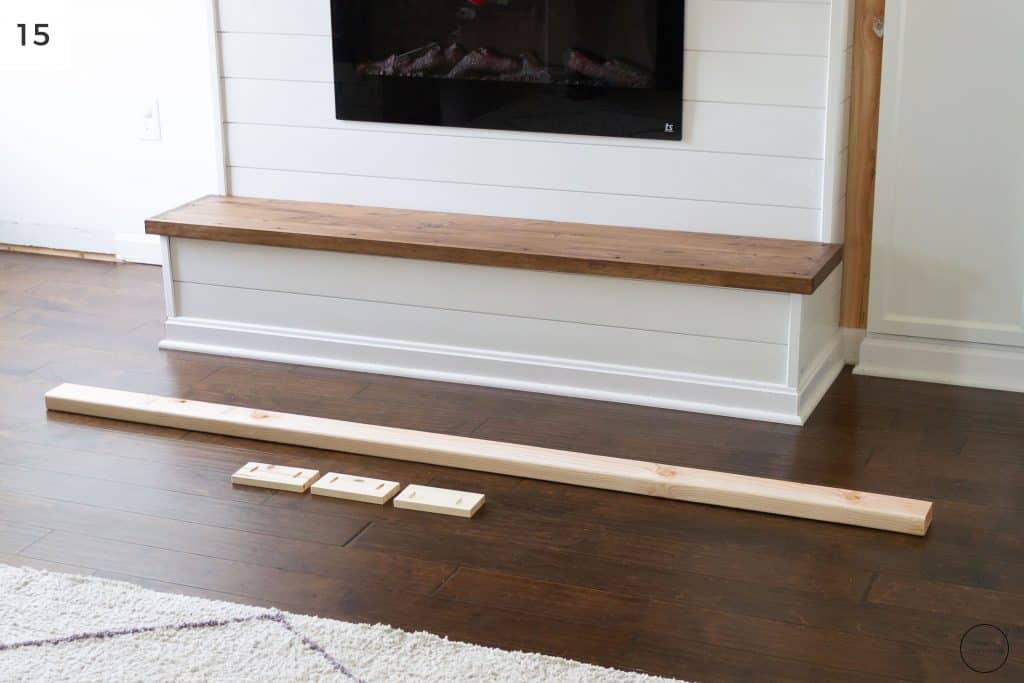
To make each spacer, Eric cut a 2×4 to 79.5″ inches and then attached 3 6-inch pieces of a 1×3 boards with pocket screws to the side. He then took this piece and screwed it into the studs on the sides of the fireplace wall.

Once you’ve installed the spacer boards, it’s time to attach the Billy bookcases.
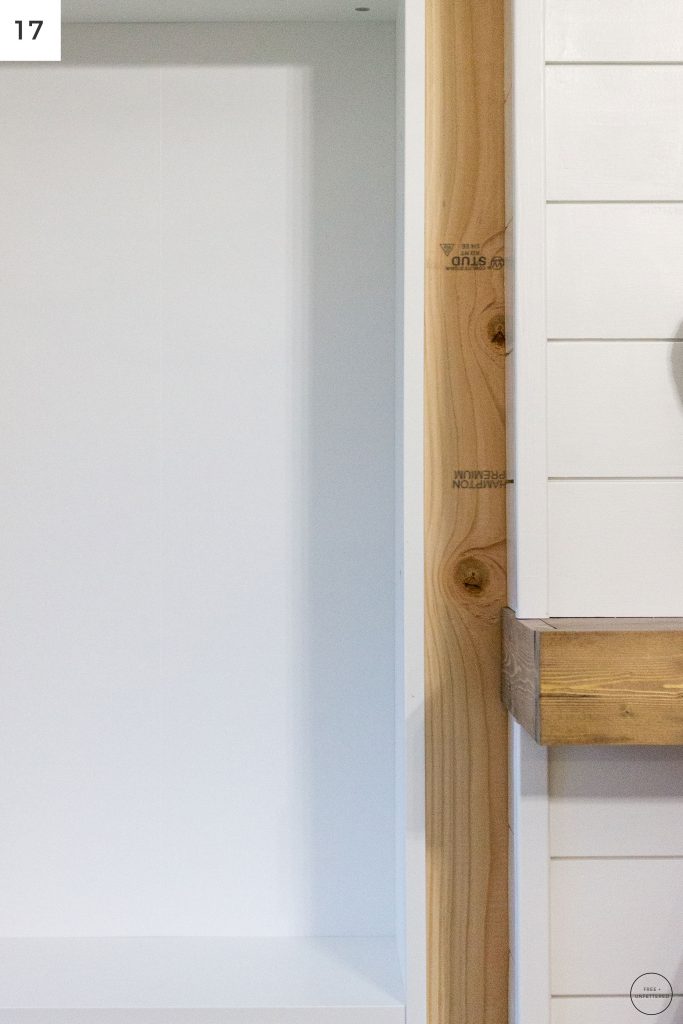
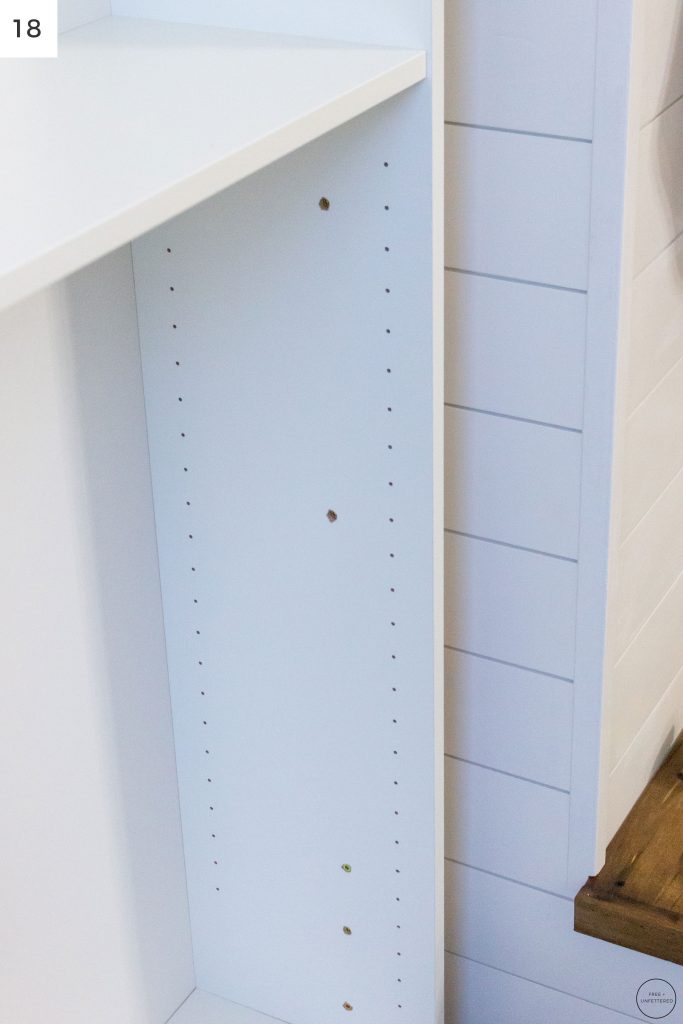
Stand the bookcases upright, ensuring they are flush against the wall and square against the spacer boards, and then mark the exact depth at which the spacer board is adjacent to the side of the bookcase.
Then pre-drill the holes through the Billy bookcase. We used (6) screws, spaced evenly from top to bottom, to attach each bookcase to the spacer boards.
After you drill your holes, you’ll want to use a counter-sink bit so you’ll be able to use caulk to fill the holes and do a quick paint touch-up at the end to make the install look seamless.
From where we raised the Billy bookcases up to our desired level and the way they’re shaped in the front, we were left with a 3/4″ gap between the baseboard and the bottom of the bookcase. Woops!
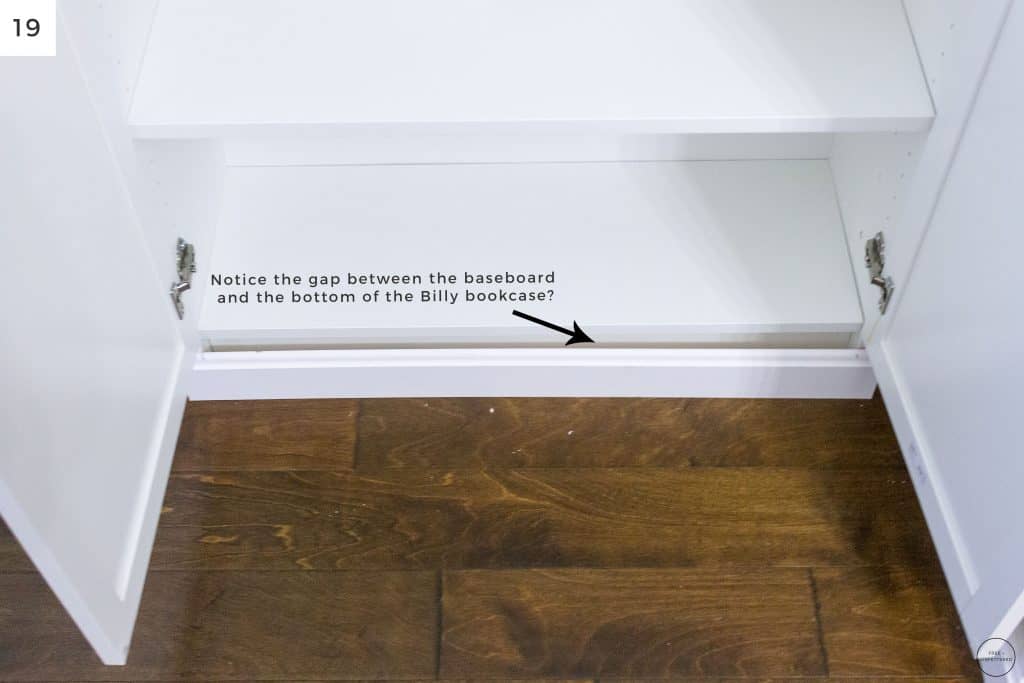
To remedy this issue, Eric went ahead and cut the baseboard to size and then attached a 1×2 with nails to cover up the gap. After all, once everything is caulked and painted, you can’t tell a thing!
At this point you can add your crown molding to the top, secure the Billy bookcases to the walls using the provided anchors from IKEA, re-attach your baseboard, and then begin to caulk and paint.
And, voila!! Congrats on your new electric fireplace surround with built-in bookcases!

If you have any questions or comments about this project or any other DIY project we’ve undertaken, please don’t hesitate to reach out and ask! You can contact me through email or reach out to me on Instagram at @freeandunfettered.
HI! This is exactly what I am looking to do! How much did this cost you?
Hi! We spent right around $800 for the entire project. This included the cost of the electric fireplace as well as the two Billy bookcases from IKEA. Let me know if you have any other questions! 🙂
Does the $800 include the ikea shelf’s!
Yep, the total amount for everything was $800 dollars. 🙂
Now that wood prices are going down, you can afford to get the cheap stuff to build everything that will be covered, including the 1×3’s. Your 1×3’s looked super nice! We must have bad stock up here in Millcreek, UT! Lowes is always the go-to for lumber but those 1×3’s used under the bookcases looked super nice. I got the cheap ones since they will just be covered by baseboard! Can’t wait to start this project!!
Hi! I want this look for my living room without the bookshelves. Have you done this for someone else?
I’ve been dying to do something like this for a while but am a DIY beginner and being that this needs to be sturdy enough to support both a tv and fireplace has always intimidated me. But your instructions are super helpful visually and I think I might attempt it. My only question is the frame for the fireplace looked real thin, what keeps the fireplace in place? Is it not able to moved forward?
The electric fireplace is recessed into the inner frame built using 2×4’s. It sits on the top of the bottom 2×4 and then is screwed into each corner of the inner 2×4 frame. The glass face plate then slides down over the front of the fireplace. Since the fireplace is screwed in and we built the frame to fit snugly around the fireplace, it is not able to move unless we were to unscrew it. Hope this helps! Let me know if you need additional pictures from the fireplace install. I can remove the glass face plate and take a quick image if you think that’ll help. 🙂
Can you share the make and model of your fireplace as well? I want to get the same one! Absolutely stunning, thank you for sharing!
Hi Brooke! We purchased the Touchstone 80014 Sideline Electric Fireplace – 36 inches (aff link) from Amazon. Thank you so much for your kind words!
Hey, do you have the tutorial for the mantel. Love the color and all the final looking. Hoping to hear about you soon ?
Sorry! I actually completely forgot about writing up a tutorial for the mantle. I’ll try to get a quick tutorial about it posted soon! We used Minwax’s Early American stain for the mantle, and then painted the shiplap the same color as IKEA’s Billy bookcases.
Here’s the tutorial for how we built the floating mantle: How to Build a Modern Farmhouse Floating Mantle
Hey! You mentioned you’d post about how you made the mantle, but I don’t see that here. Could you give a quick rundown? We’re about to build based on this and would love to have those instructions, too.
Hey there! Yep, I completely forgot about writing up the mantle tutorial. I’ll try to get a quick rundown posted late tonight/early tomorrow. Hope that’ll help! If you have any other questions during the building process, feel free to reach out!
Here’s the tutorial for how we built the floating mantle: How to Build a Modern Farmhouse Floating Mantle
Hi! Thanks so much for sharing this. Can you tell me the dimensions of the wall that you put this on, please? Can’t wait to try this out for my home.
Hi there! The wall is 14’10” wide and the ceiling is 10′. Hope this helps!
Hello!
I would really Like to install and electric fireplace and bookshelf just like you did, although I am not handy at all and to be honest probably don’t give my husband enough credit. I wanted to reach out because before we start this project I wanted to know if we have questions along the way, would you be will to help answer those for us? I am sure we will have plenty ?
Of course! Just send an email to freeandunfetteredblog@gmail.com with any questions you guys may have along the way. Happy building!
This is amazing! Could you tell me how wide this entire unit is from bookcase to bookcase?
Thank you! The entire width is 133 inches wide. You could easily shorten or widen it by swapping in different bookcases from IKEA if needed, though. 🙂
Love it! We are doing something similar. Did you paint the shiplap the same color as your walls?
We considered it, but in the end we decided to have Home Depot color match the shiplap paint to the Billy bookcases so it would blend seamlessly.
Hi. What color did you use. And was it a flat or eggshell?
Hi Kelsie! We had Home Depot color match our paint to the Billy bookcases. They actually recommended a Satin finish as it’s what most closely matched the Billy.
We love what you’ve done and are excited to try your plans! One question – do you still like your fireplace insert?
Great job!
Thanks! We still like the fireplace insert we chose and haven’t had any issues with it. ? Good luck with your build! Please let me know if you have any additional questions.
This tutorial is super helpful! I’ve been searching Pinterest for this exact look and I just couldn’t find it until now! And the billy bookcases will be SO much more affordable than custom cabinets
Do you remember what white paint you used to match the IKEA shelves?
Hi Jake, we took one of the doors from the Billy bookcase into Home Depot and had them color match it for us. 🙂
LOVE IT! What stain color did you use for mantle?
Thank you, Stephanie! We used Minwax Early American stain.
Question – how do you access the outlet? We’re thinking of doing this but if we want to mount a TV or even plug-in Christmas lights once a year we’ll need to be able to access the outlet behind the unit. Did you incorporate an access panel?
Hi, Meg. We did cut an access panel into the plywood in case we ever need to access the wall outlet in the future. If so, we’d just cut an access slot into the shiplap as well.
This is just gorgeous!! Great Job!!!
Your fireplace looks amazing! Just found it on pintrest and excited to get to work on it in my home! Quick question though… do you have a printer friendly version of your supply list? Thank you in advance.
respecfully,
Joanne Hackett
Sorry, Joanne, at this time I do not have a printer-friendly version of the supply list. I’ll add it to the ‘To Do’ list! ??
Hey! Do the bookcases come with doors from Ikea? How did you do that part?
Hi Kristie, we purchased the Billy/Oxberg combination from IKEA. If you scroll down to steps 16-20 (labeled on the pictures) it details how we went about attaching them to the fireplace feature build-out. Here’s the link to the bookcase: https://www.ikea.com/us/en/p/billy-oxberg-bookcase-with-doors-white-s29281066/
How tall is the center part of this fireplace? I can find the dimensions of the bookcases but wondering about finished dimensions of middle part.
Hi Allie, the fireplace build-out is 90” from the floor to the top, not including the crown molding.
We just finished this project and I LOVE it! We got it done just in time for Christmas decorations! It is perfect! Thanks so much for the instructions! 🙂
We just finished this project! It turned out perfectly and I’m SO happy with it! Thank you so much for the instructions!!
Thank you for this! This was the first thing I was recommended when I joined Pinterest after purchasing my first house. My house had a poorly done garage to living room conversion and one of my first priorities was to dress up the space. I am definitely new to working with wood, but with your tutorial and my dad’s help we were able to build out a fireplace to custom fit the space. We ended up going with the 50” version of the insert and only building the fireplace piece up to the mantle as the wall I wanted it on had a small window in the middle so we built under it. (We had to extend the mantle to cover the whole top). I think it turned out great! Even though we had to adjust the plans based on the requirements of the room, this was super helpful to get us started out. The room went fr creepy to cozy just in time for Christmas!
Thanks for the great instructions! Mine came out great. Finished it in 6 days (while working full time with 2 kids under 5) and I couldn’t believe how easy it was! Wish I could post a pic for you!
Love this! How do you turn on and off the fireplace? Thanks 🙂
Hi Candace, the fireplace we purchased came with a remote. 🙂
I’m so shocked no one has asked about the ship lap. Did you cut it or is it a product that can be bought? it’s looks flawless.
Hi Mandy,
We purchased pre-primed ship lap boards from the store and then cut them to size. Thanks for asking!
What color and brand do paint did you use for the shiplap to match the IKEA shelves?
Hi Casey,
We actually took one of the bookcase doors into Home Depot and had them color match it for the paint. We selected Behr for the brand.
Ahhh so excited. I found this last year and have been anxiously waiting to start. We don’t have an IKEA where we live so had to make a trip. We just got the bookcases and hoping to start the project soon!! I am sure I will have a question along the way LOL
What did you use for crown? It doesn’t look like anything I’ve seen in a store, so wondering if it is homemade.
Hi Shawna, we used a combination of 1×3’s and 1×2’s for the crown.
Absolutely obsessed with this and looking to hopefully get this project done this month before Christmas! Only question I have is do you think this would support a tv?
I am in the process of customizing your plan, for my own fireplace. I am wondering if you used anything on the mantel and hearth after staining it, to seal it.
We used Minwax Polycrylic in Matte Finish to seal both the mantel and hearth. 🙂
Hi Jillian! We just did something similar in our house. I’m trying to figure out what to do at the top. Could you share what molding you used at the top of your fireplace? It’s the exact look I’m looking for but can’t figure out what it is. Thank you!!
Thank you for the great tutorial! Just finished our fireplace project. Turned out great!
We made it! Finished it in time for Christmas, and it looks amazing! (Well, we still need to add trim.) But we’re so happy with how it makes our living room feel. I had been wanting to build something like this for awhile, and ran across yours and loved it 🙂 THANK YOU!
Love this! Made it so easy to do in my home.